How To CAT
Negating Conditions and Triggers 17
Conditional Action (Action/Utility/Conditional Action) 33
Debug Log Action (Action/Debug/Log Action) 42
Forcing a State Switch In Play Mode 42
Manual Action Execution In Play Mode 42
Loading Scenes From Asset Bundles 89
FIrst Person Controller Example 92
Side Scroll Controller Example 92
Third Person Controller Example 92
Top Down 2D Controller Example 93
Side Scroller / Super Cotton Candy Boy 94
Integrating CAT into Existing Systems 99
Building Systems that Use CATs 100
CAT Game Builder is made up of 4 main components: Conditions, Actions, Triggers, and State Machines. There are many types of Conditions, Actions, and Triggers which can be used within State Machines or other systems to build game logic.
Conditions check some state and either succeed or fail depending on if it matches what is expected. They only check when they are executed and unlike Triggers, they do not continue to check over time. Some examples of Conditions are the Mouse Button Condition, Keyboard Condition, and Proximity Condition.
Actions are the main building block and how everything gets done. They perform some function within your game. Actions can come in several different types based on their use case. Instant Actions complete immediately. These include the Change State Action, Enable State Machine Action, and Stop Sound Action. Actions can also have a duration. In this case, the action will run over several frames until it is completed or it is explicitly stopped. An example of this type of action is Navigate To Action. The final type of Action is a continuous action. These Actions stay active once started until they are stopped by some outside means. These include Triggered Action, and Start Stop Action. Many Actions will belong to a different category depending on their settings. For example, the Play Sound Action is typically a duration Action. If the Loop flag is on, then it becomes a continuous action.
Triggers are a bit like Conditions in that they notify of changes in state, but they check over time. They have two states-- either they are triggered or not. When they are triggered, this means the state they are checking matches what is expected. Some examples of Triggers are the Keyboard Trigger, Mouse Button Trigger, and Proximity Trigger.
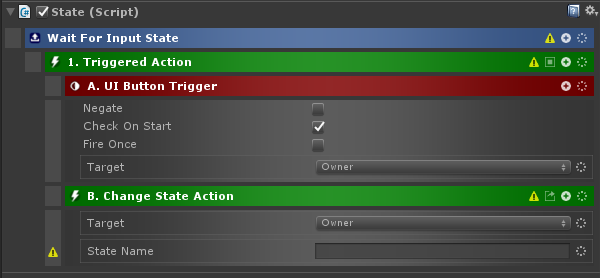
State Machines are what glues the rest of the CATs together. State Machines are surprisingly enough composed of States. Only one State can be active at a given time, and Actions can be used to change the active State. States can have any number of actions, all of which are started when the state becomes active and stopped when it is no longer active. States can also have Stop Actions, which are actions whose name starts with “stop”. These special actions can not be Continuous and will be run when the State becomes inactive.
CAT Game Builder also comes with some additional systems which make use of CATs including the Storage System, UI System, Value System, and Quest System.
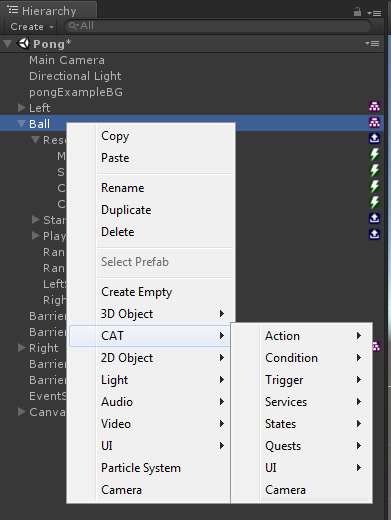
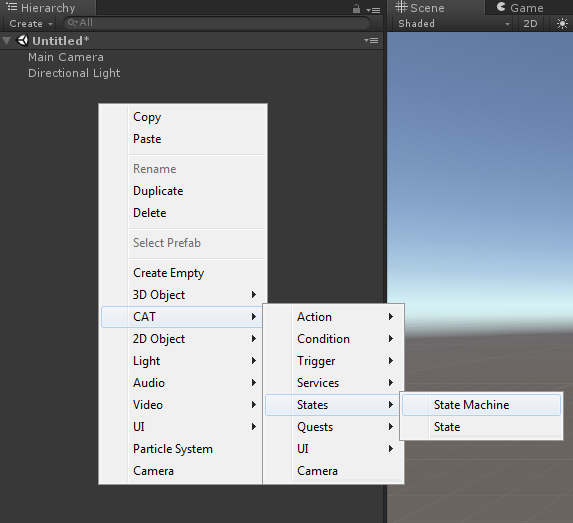
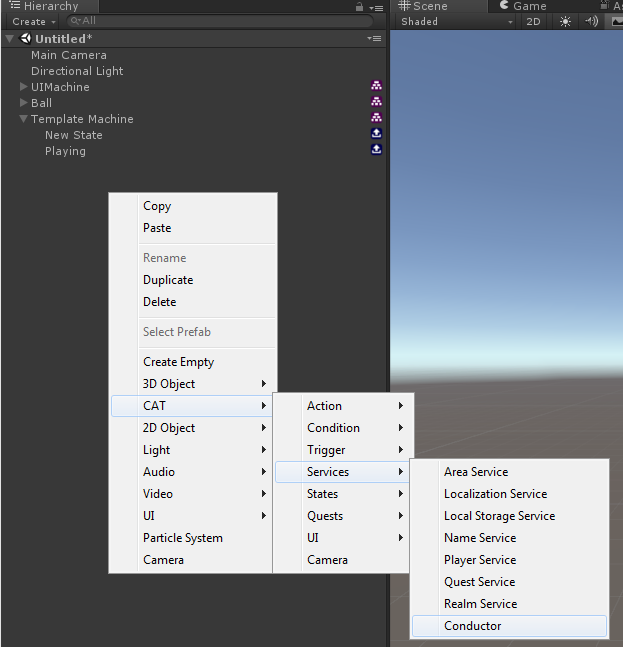
Cats can be added to your scene in a number of ways. The first way is by right clicking on the hierarchy and going to the CAT menu:
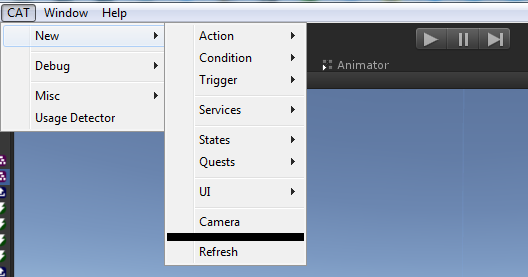
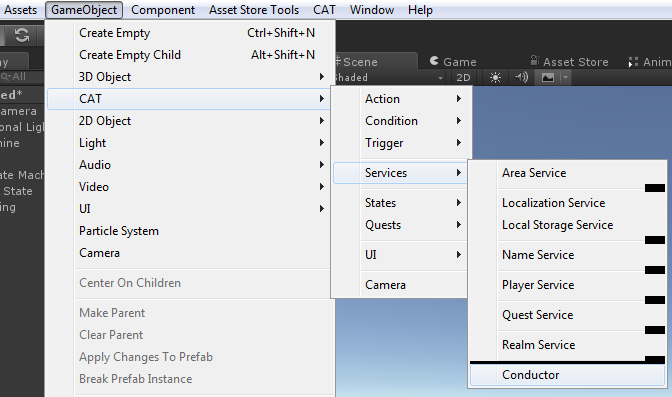
You can also use the CAT menu at the top of the screen:
In both cases, there are sub-menus for Actions, Conditions, and Triggers which contain all the CATs available.
The third way to create CATs is via the CAT Selector, which will be explored in more detail further down.
CATs in the Editor
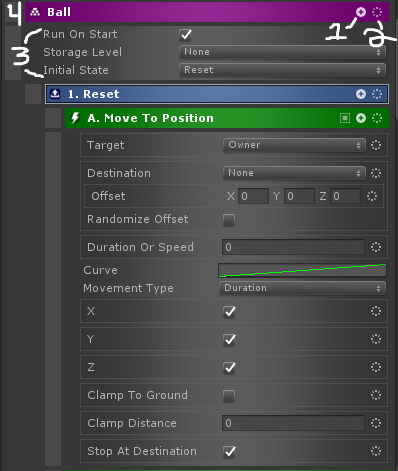
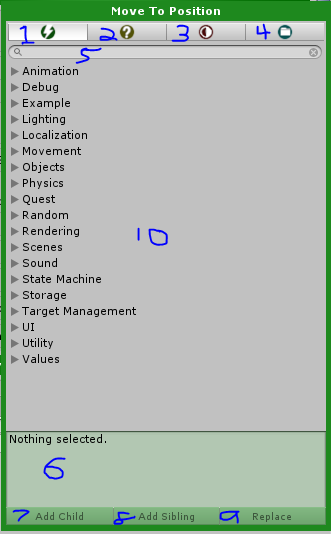
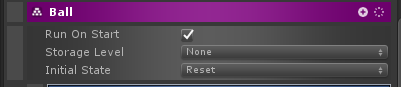
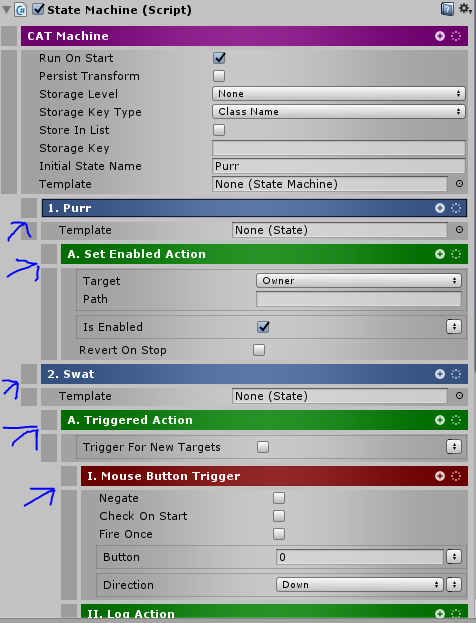
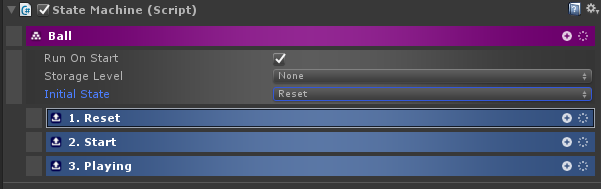
This is a typical view in the inspector. “Ball” here is a State Machine, and “Reset” is a state. “Move To Position” is an action within the “Reset” state. The hierarchy for this looks like:
To explain the numbered points in the first image:
Also note that everything is indented in the same way it is in the Hierarchy view.
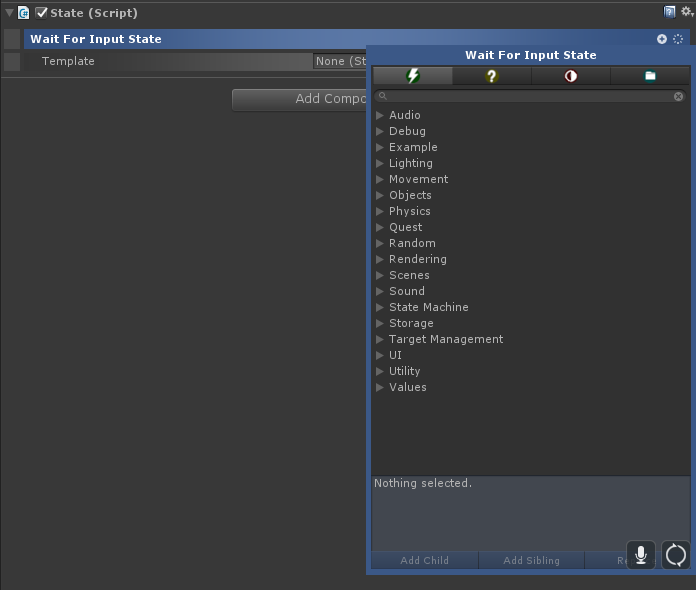
This is the CAT Selector Window:
This window comes up when you hit the + button. It will disappear if you click anywhere outside of it.
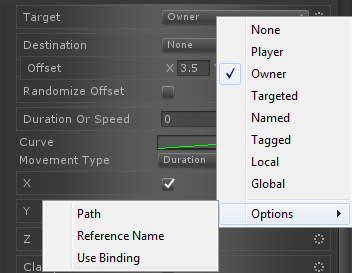
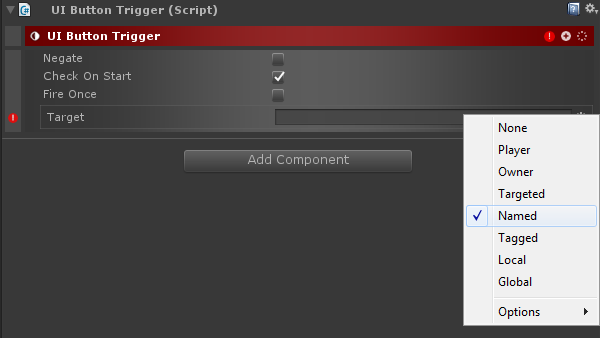
Almost as important as CATs themselves is Targeting. All of CAT uses Targeting in some way. Targeting is how you point at specific Game Objects in CAT. This is typically through either a CATarget or CATargetPosition. The difference being that CATargetPosition targets positions in space and CATarget targets Game Objects. This is what a CATarget looks like in the Inspector:
They can look different depending on the selection in the drop down there. For example, changing it to Named looks like this:
CATarget Positions look similar but optionally with some extra fields:
As you can see, a CATArgetPosition includes the fields from CATarget.
Whenever anything happens in CAT, it is given a context of an “owner”, a list of “targets”, and local values. Owner is always the State Machine that is executing the action, but Targets can be pretty much anything. Targets starts off empty and is filled depending on context. For example, Conditional and Triggered Actions (see below) pick up new Targets based on what caused the Condition or Trigger to be true. In particular, imagine a Proximity Trigger in a Triggered Action. Whenever something enters the proximity and causes the Trigger to fire, it will be sent as a Target. There are also Actions that can directly manipulate the Targets in various ways such as filtering them or adding new Targets.
Back to CATarget, though. The drop down (or the gear button on the first line) is for setting the class of target. The options are:
For Named a Text Box will appear like this:
That Text Box is where to put the Name. You can also drag in a Game Object from the Hierarchy. For Tagged, a Drop Down with all the valid Tags will appear.
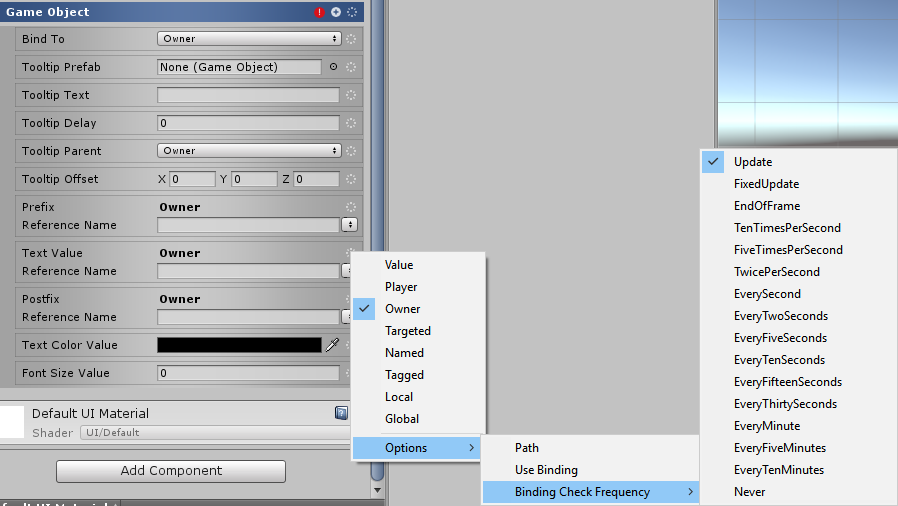
Note that the gear menu also has an Options section.
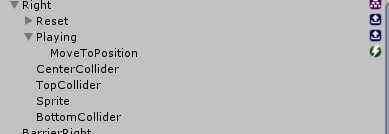
In here is the option to show a path. This can be used to select objects by their Hierarchy path. The way this works is that an initial selection is made based on the Target Type (Owner / Player / Named / etc). Then if Path is specified, for each selected Game Object, a new Game Object with a Path relative to the original one will be selected. Consider the following Hierarchy:
If Owner was “Right”, and the CATarget was set to Owner and a Path of “Reset”, then the selected Game Object would be Reset. If the Path was set to “Playing/MoveToPosition”, then the selected Game Object would be MoveToPosition.
If in this example, the CATarget was set to Targeted and LeftText and RightText were the Targets, if the Path was “GameObject”, then both GameObjects would be selected.
If the path is set to just *, then all children of the selected GameObjects will be targeted. If the path ends in /*, then the children of any GameObjects at that path will be targeted. * can not be used as a wildcard in any other way at this time.
The next option in the gear menu is Reference Name. This has to do with Values. When selected, a Reference Name text box will appear:
You can set it to the name of a Value, which is expected to contain either a GameObject or a GameObject List. When you do this, the selected targets will be whatever is in the Value. See the section on Values for more information on how to use this system.
The last option is Use Binding. When checked, the Databinding Owner will be selected for each target. Note that this selection occurs before following reference name or path.
Most users of CATarget will work with 0 or more selected targets. In some rare cases, they will only work with the first selected Target.
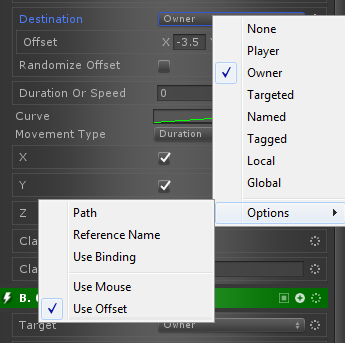
Let’s have another look at CATargetPosition:
By default, it looks just like CATarget. Without other options, the resulting positions will be the positions of the targeted Game Objects.
If you click the gear icon, there are additional options available:
Path, Reference Name, and Use Binding work the same way as on CATarget. Use Mouse and Use Offset are the two new options for CATarget Position.
Selecting Use Mouse will remove the CATarget portion and the CATargetPosition will only select positions based on the location of the mouse pointer.
The optional Raycast parameter which appears when Use Mouse is selected will select positions at the intersection of a ray cast from the mouse location through the camera and whatever collider it hits.
The second option, Use Offset, can be used to specify an offset from the selected targets (applied to each target).
If the Randomize Offset parameter is checked, then instead of using exactly the Offset, it will each time generate a random value between the negative and positive offset. For example, if the offset was (1, 2, 3), the random value would be between (-1, -2, -3) and (1, 2, 3).
That’s it! Targeting in CAT can be a bit confusing at first, but it is also extremely powerful and is one of the major defining features.
State Machines
In CAT, one of the main ways to use Conditions, Actions, and Triggers is within State Machines. State Machines consist of one or more States. States define individual behaviors. Some examples of States might be Run, Jump, or Crouch. Only one State in a State Machine can be active at any given time. For more information on the concept of State Machines, check out this definition. CAT works off of the Unity scene hierarchy, so in order to assign States to State Machines, they must be children in the hierarchy:
In the image above, Ball is a State Machine and Reset, Start, and Playing are all States. Similarly, to attach Actions to something, you make them children of it.
Actions can be parented to State Machines directly. When this is done, they will be started when the State Machine starts, and they will be stopped when the State Machine stops. This can be useful for any behaviors that are active no matter what State the State Machine is in.
Actions can also be parented to States. In this case, whenever the State is active, they will be started. When another state becomes active or the State Machine is stopped, the Actions will be stopped.
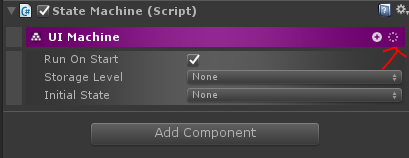
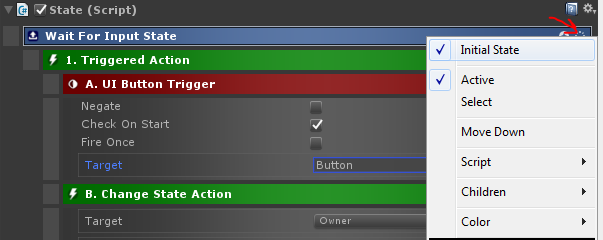
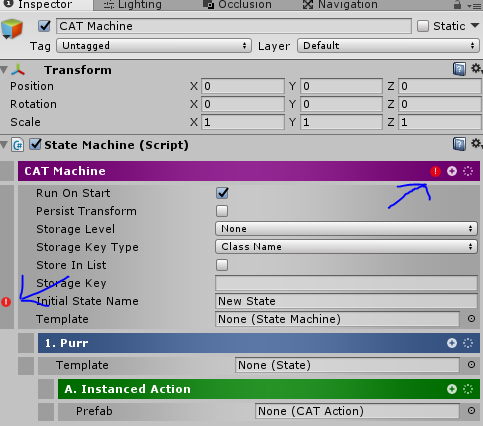
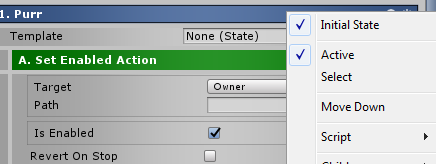
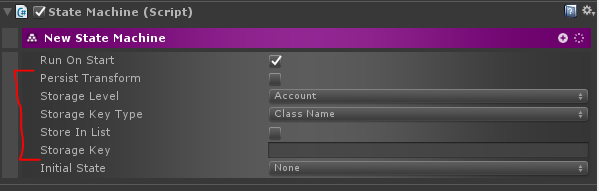
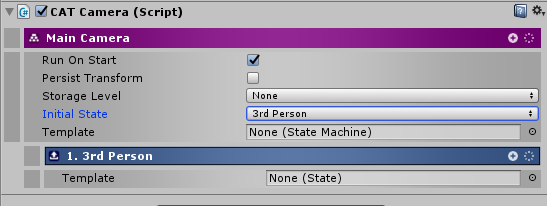
State Machines have some options in the inspector. Run on Start means that as soon as the State Machine’s Game Object enters the scene, the State Machine will start up. Storage Level deals with the Storage System which you can read about later in this document. Initial State denotes the first state the State Machine will activate when it starts.
You can create State Machines in multiple ways. First, you can right click on the hierarchy:
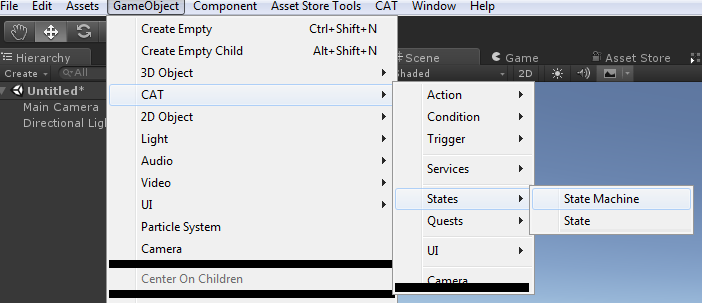
You can also use the GameObject menu:
Or the CAT menu:
Finally, you can just add the State Machine component to any Game Object:
On CAT Conditions and Triggers, you will always see a bool field at the top of the Component called Negate.
Negate is an option for when you want your Trigger or Condition to fire the opposite value of what was being evaluated. For example, let’s say you have a GameObject Value Condition and you set the comparison field to Is Null. You could then check the Negate box and now your Condition will fire True when the GameObject value is not null.
In CAT, you can use State Machines to construct things like your player, your AI, your UI, almost anything. Each State Machine can contain Actions, Conditions and Triggers which will run as long as the Machine is active. The Machines can also contain States, containing more Actions, Conditions and Triggers. Every State Machine requires an Initial State, from there the current State of the Machine can be determined by logic within the Machine, or from within other Machines.
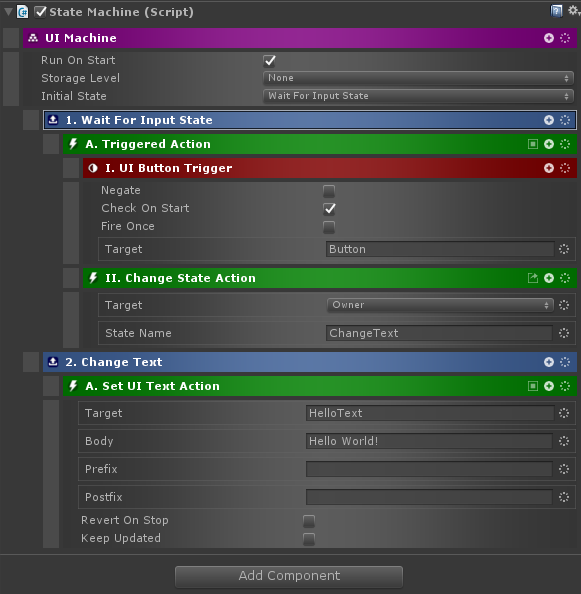
So, let’s make something basic. Why don’t we make a “hello world” button?
First, why don’t we add the Unity Components we need and get that out of the way:
That is all the UI we need for this, so let’s add our UI Machine.
CAT includes a system for storing, retrieving, and modifying values of various types. These include numbers (float, int), booleans (true or false value), text (string), Unity Game Objects, and others. The Value System takes care of this. Values can be used almost anywhere in CAT components in the Inspector.
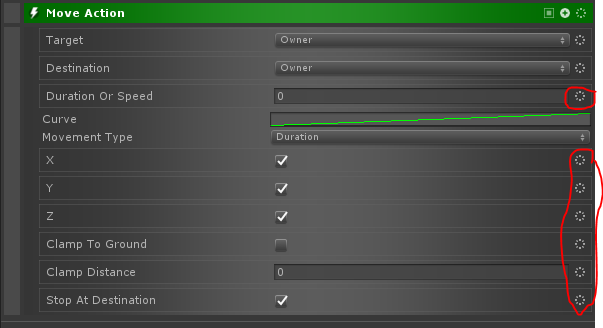
Above is the Move ction. The fields which use Values can be identified by the drop down buttons in the blue circles. In this instance, all of the Value fields are set directly. In that case, they look almost like a normal field of that type minus the extra drop down button.
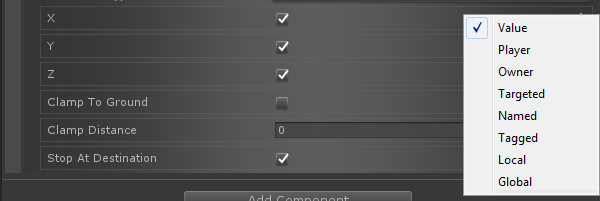
In addition to a standard value, Value fields can also reference a Value stored elsewhere. To do this, click the drop down button for that field:
There are multiple options here, and many of them overlap with the options from CATargets that were mentioned in the section on Targeting. In this case, the setting is directing the Value System to where this Value is stored. When set on Value, it is stored in the field itself and works as if it was a normal field of the same type. Player, Owner, Targeted, Named, and Tagged all reference Targeting options and mean the same thing as they do there.
CAT has a set of Global Values. These are available everywhere. Selecting Global on the drop down will cause that field to reference a Global Value.
Conversely, there is a local context which is applied to the currently running CATs. It has a set of Local Values. These are ephemeral and will disappear as soon as whatever CATs are running stop. However, using Values in here can be useful in cases where a Global or Value attached to a Value Holder doesn’t make sense. For example, in cases where a calculation is being done on a Value before using it elsewhere.
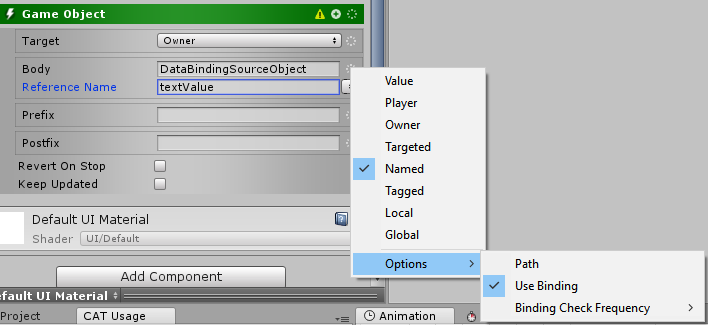
If something other than Value is selected on the drop down, the field will change to a reference. The top part of the reference should be familiar from CATarget. It works exactly the same. The point is finding a Game Object to target. Note that if the selected Target Type results in multiple targets, only the first will be used for the Value.
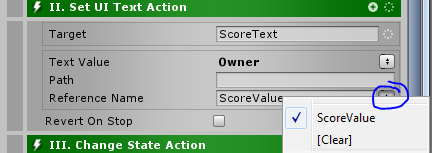
Below the CATarget fields is Reference Name. This refers to the name of the Value on the target that should be referenced. There is a drop down next to the Reference Name field that will contain names of Values that have been used in the project to make it less likely there is a typo.
Typically, when using a Value field as a reference, the target should have a Value Holder component. If it does not, or if the Value Holder doesn’t have the specified Value, CAT will attempt to find a Unity component on the target which has a field matching the Reference Name. If the type of the field is correct (i.e. text, number, etc), the value of that field will be used. This is done as part of CAT’s databinding engine and the value will always match that on the component it references. You can also use dot notation to drill down to sub-values. For example: position.x will reference the X component of the target’s position. Back to the Value Holder component, though:
This component can be added to existing Game Objects using the Add Component button in Unity as normal. Often, this will be added to Game Objects with State Machines on them, but it is possible to have a Value Holder without a State Machine.
It is possible to create Values on a Value Holder while editing or while playing. Anything created while Playing is lost after exiting play more (or exiting the application); however, the Values added while editing can be set to persist between sessions. To do this, see the section on the Storage Service.
Value Holders can also reference templates. This is a Value Holder in a prefab that is added to the Template field. When the Value Holder initializes, it will create a copy of all the Values attached to the Template Value Holder and copy them to itself. If a Value exists on the Template with the same name, it will not be copied.
To define new Values to a Value Holder at edit time, use the add button:
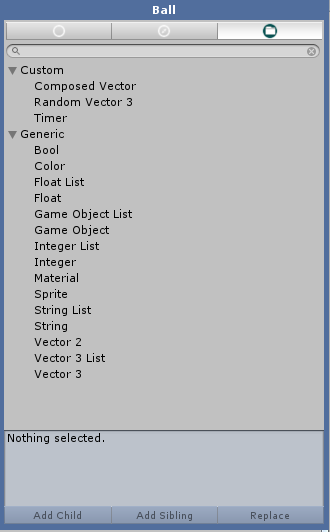
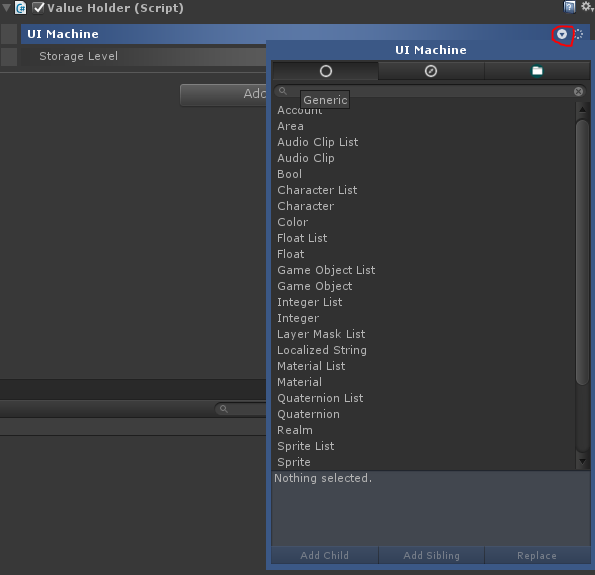
Clicking this brings up the Value Selector Window:
This window is similar to the CAT Selector Window. The first tab is Generic Values. These represent a single type and have a static (though modifiable) value. The second tab shows Custom Values. These represent Values that typically aren’t set directly. For example (as shown above), the Timer Value represents a timer that can be started and stopped via Actions. Then, its current time can be referenced at any point or used as a parameter in another CAT component. The third tab (selected in the screenshot above) will show both Custom and Generic values.
Double clicking a Value or selecting one and clicking Add Child will cause the Value to be added to the Value Holder.
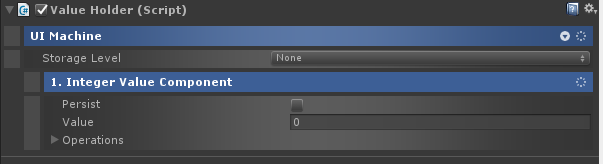
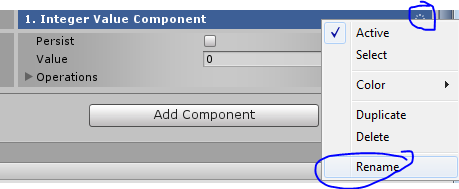
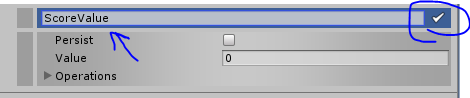
After adding the Value, rename it using either the hierarchy or the dropdown options button. The name of it must correspond to the Reference Name when referencing the Value from elsewhere.
Generic Values have a Persist checkbox. If checked, the Value will be saved whenever the Value Holder is saved.
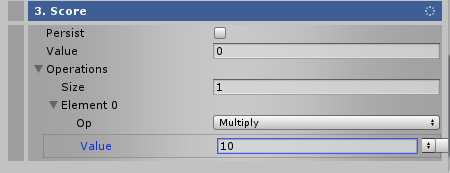
Some types of Values can have a number of Operations. These are mathematical operations which are applied to the base value. This can be used to modify the value when retrieving or setting it. For example:
Here, there is a single Operation which will multiply the value by 10. This means when retrieving the value from a reference, it will multiply the base value by 10. When setting the value, the incoming new value will have the inverse happen. It will be divided by 10. Note that the Value on the Operation is itself a Value field, so it can reference other Values. Operations are applied in forward order for retrieval and reverse order for setting (with inverse operators of course).
Values can also be added to a Value Holder during runtime. To do this, just reference a named value on a Value Holder. If the first reference is setting the Value, it will first create a new Value with that name and then set it to the provided value. If the first reference is retrieving the Value, a new Value will be created and the default value for it returned. For numbers, this is 0, for boolean, it is false. Strings are an empty string, and Vectors are all 0’s.
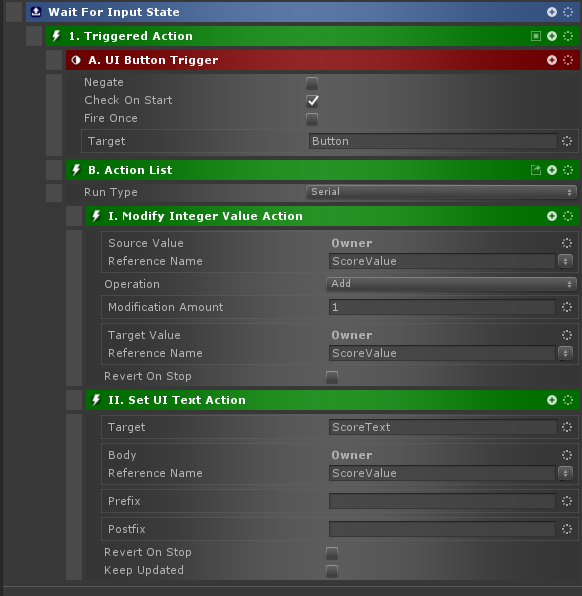
Playing off our first example a bit, we will instead have a button which when pressed, increments a score value on screen.
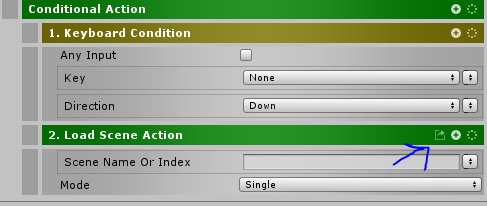
This special action will execute any child actions (that are not else actions) if its condition (also a child) is true. The way this works is that as soon as the Conditional Action is run, it immediately checks the condition. If the condition succeeds, then it will start any child actions (that are not else actions). If those actions have a duration or are continuous, they will continue to run until they finish or the Conditional Action is stopped. If the condition does not pass, then any else actions that are children of the Conditional Action are run. As with the other case, duration or continuous else actions will continue to run until finished or the Conditional Action is stopped. The differences between Conditional Action and Triggered Action can sometimes be confusing at first. Conditional Action only checks the condition when it is first executed while Triggered Action uses a Trigger to continuously update whether the actions or else actions should be running at any given moment. An example Conditional Action use case would be to change state to “Done” if the player has collected 10 flowers, and if not, to change state to “CollectMoreFlowers”. Actions under a Conditional Action have an extra icon which when activated (by clicking on it) will make the Action an Else Action.
Conditional Actions will also be added automatically when adding a Condition using the CAT Selector Window if you are adding it somewhere that Actions are allowed but Conditions are not.
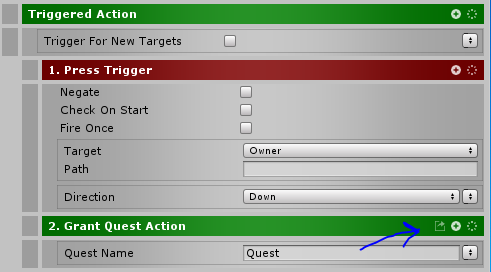
Triggered Action (Action/Utility/Triggered Action)
This action uses a Trigger to start and stop child actions. When the trigger becomes satisfied (or true), Triggered Action will start any child actions (that are not else actions). If the trigger subsequently becomes false, it will then stop any child actions (that are not else actions). If there are any else actions defined, they will be started and stopped in exactly the opposite times. The differences between Triggered Action and Conditional Action can sometimes be confusing at first. While Triggered Action will constantly monitor the state of the trigger and turn actions on or off accordingly, Conditional Action only checks its condition at start. A great use for Triggered Action would be to set an animation parameter called “angry” whenever an enemy comes within range. Actions under a Triggered Action have an extra icon which when activated (by clicking on it) will make the Action an Else Action:
TriggeredActions will also be added automatically when adding a Trigger using the CAT Selector Window if you are adding it somewhere that Actions are allowed but Triggers are not.
Condition List (Condition/Utility/Condition List)
For Conditions, Actions, and Triggers, there is an associated list. While these aren’t always necessary to use, there are some cases where they are extremely useful. For Condition List, as the name implies, it deals with a list of conditions. These sub conditions should be children of the Condition List. Whether the Condition List is “true” depends on the state of the child conditions along with the Evaluation Requirement parameter. Evaluation Requirement determines which (if any) child conditions must be true for the Condition List to be “true”. Condition Lists can be nested as well to build complex conditions.
Action List (Action/Utility/Action List)
For Conditions, Actions, and Triggers, there is an associated list. While these aren’t always necessary to use, there are some cases where they are extremely useful. Action Lists can be used to group multiple actions together. The sub actions should be children of the Action List. Additionally, you can specify how to run the child actions. This is done through the Run Type parameter. When set in serial mode, the Action List will initially start the first action. It will wait for that action to finish and then start the second and so on until it gets through all the child actions. These are done in the order they appear in the hierarchy from top to bottom. The Action List (when set in serial mode) will not be considered finished until the last action has finished. Note that in serial mode, continuous actions are not allowed and will cause an error. This is because there would be no way to stop the continuous action and start the next one, so the chain would be stopped there. Another useful Run Type is parallel. In cases where multiple sub actions are allowed and no Run Type can be specified, this is the default. With parallel mode, all the child actions are started when the Action List starts. The Action List is not considered finished until all the child actions have finished. If any of the child actions are continuous, the Action List (when set in parallel mode) will be considered continuous as well. Finally, there’s the Single Random mode for Action Lists. In this mode, a single child action is picked at random and started. No other actions will be run. For all Run Types, stopping the Action List while running will stop any running child actions and for serial mode, no more actions will be run. As with Condition Lists and Trigger Lists, Action Lists can be nested.
Trigger List (Trigger/Utility/Trigger List)
For Conditions, Actions, and Triggers, there is an associated list. While these aren’t always necessary to use, there are some cases where they are extremely useful. Trigger Lists are very similar to Condition Lists in that they can be used to create complex triggers. To group Triggers in a Trigger List, just add the Triggers as a child of the Trigger List. Like Condition Lists, Trigger Lists take an Evaluation Requirement. It works exactly the same way in specifying how many (if any) Triggers must be triggered in order for the Trigger List itself to trigger. Like the other lists, Trigger Lists can be nested for more complex behavior.
Delayed Action (Action/Utility/Delayed Action)
This useful action will wait some number of seconds and then execute any child actions. The Delayed Action won’t be considered finished until all child actions finish, and stopping it while the child actions are running will cause them to stop. Note that the child actions will all run in parallel. Stopping the Delayed Action before the delay is finished will cause any child actions to be skipped. Delayed Action can also be used in Serial Mode Action Lists with or without any children to delay any actions below it in the list.
Looping Action (Action/Utility/Looping Action)
This special action has quite a few options, but it is fairly simple at its core. By default, it will run all child actions in the same way an Action List does except it will loop them over and over until the Looping Action is stopped. If the Run Type is set to Serial, child actions will run one at a time in order until the last one, at which point, a new loop will start back at the beginning. In Parallel Mode, all child actions will run at once, and a new loop will start as soon as they’ve all finished. With Single Random Mode, a single child action will be randomly chosen and run. Once it is finished another loop will start with another randomly chosen child action. Note that the same action may be randomly chosen multiple times. Since there is no way to stop a child action without stopping the Looping Action, child actions of Looping Action are required to not be continuous.
Looping Actions also have a Delay parameter. If set, it will delay for this many seconds in between loops. Otherwise, loops will just run immediately. Another parameter is Loops. If this is greater than 0, it specifies how many loops to run before finishing. For example, if set to 5, the child actions will run 5 times and then the Looping Action will be finished. The Loops and Delay parameters can both be set, and the Looping Action will run the actions the specified number of times with a delay in between each run.
Another feature of Looping Action is conditional looping. To use this, add a Condition as a child of the Looping Action. This Condition will be checked every loop, and if it is ever false, the Looping Action will stop and no further loops will be executed. The Check At Begin parameter controls whether the condition is checked before the loop starts or after it finishes. This can be useful to ensure the loop executes at least once (by setting Check At Begin to false). The conditional looping feature of Looping Action can be combined with both Delay and Loops to add a delay between loops or a maximum number of loops to be executed.
Instanced Action (Action/Utility/Instanced Action)
This Action can be used to create macros. It takes a prefab Action as a parameter and when run, it will create a copy of the prefab (instantiate) and then execute the Action. The prefab will be destroyed when the action is finished running. If the Instanced Action is stopped while the prefab Action is running, the prefab Action will be stopped (and destroyed).
On Start And Stop Action (Action/Utility/OnStartAndStopAction)
The On Start And Stop Action will run any actions underneath it. If they are not tagged as Start Actions, they will be run while the On Start And Stop Action is running. Otherwise, they will be run when it is stopped.
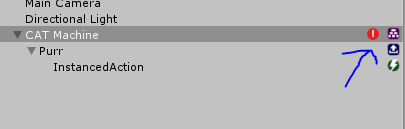
In the editor, CATs within the scene are constantly checked for problems. When there is an issue, a Warning or Error icon will show up in a variety of places. One place it will show is in the Hierarchy:
It will also show up in the inspector if the item is selected:
Note that it shows both in the top bar of the element with the Error and on the field that has the Error. Some Errors or Warnings are not associated with fields, so there will not be an additional icon beyond the one in the top bar.
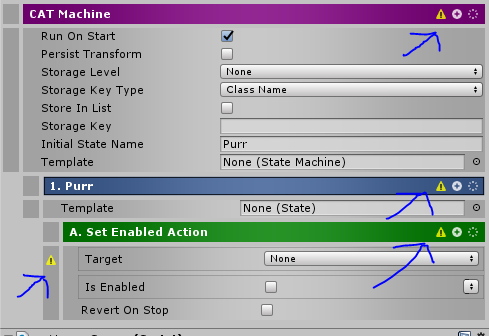
Here’s an example of the Warning icon:
And in the Inspector:
Note that the Warning is in Set Enabled Action, but it is echoed all the way up the hierarchy in the inspector view. This is to ensure it is visible.
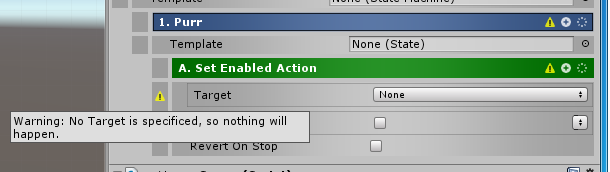
There are multiple ways to show the actual Error or Warning. The first is to hover the mouse over the Error or Warning Icon in the Hierarchy:
You can also hover over the icon on the field in the inspector:
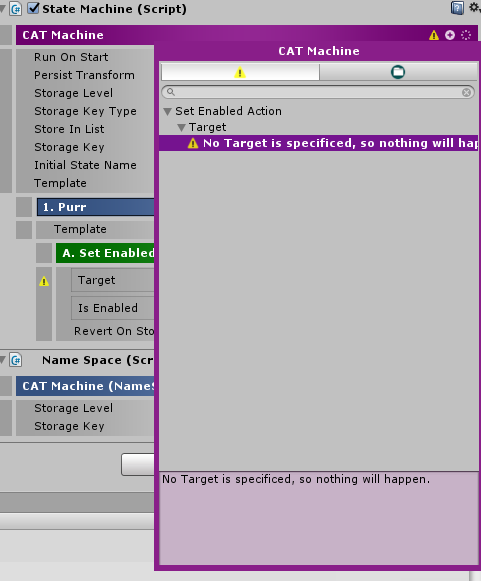
Finally, clicking the icon on the top bar will display the Error / Warning display window:
In the Error / Warning display window, double clicking on an Error or Warning will highlight the source of the problem in the hierarchy.
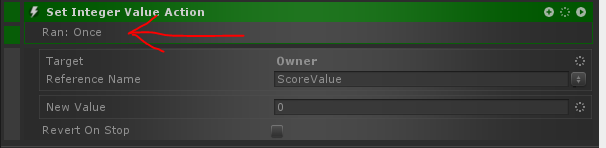
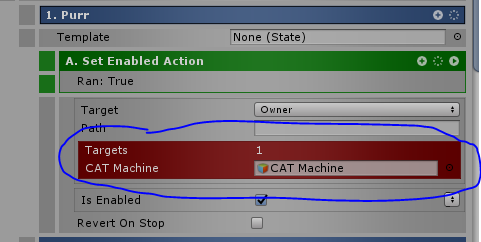
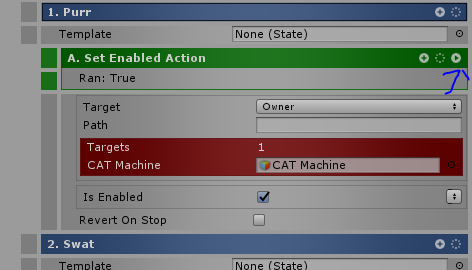
When in Play Mode, there is quite a bit of useful debug information displayed in the editor. Running State Machines and their active State are highlighted in green in the Inspector:
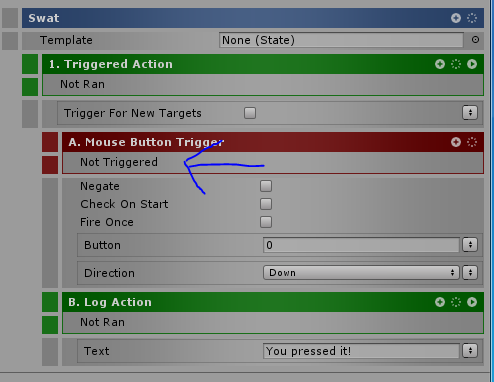
Actions and Triggers will also highlight red when they are running or listening. Additionally, since Actions can be instant and therefore the highlight might not be seen, Actions will report in the Inspector how many times they’ve been run:
Additionally, any CATargets that have been queried will display the last targets they selected:
For Triggers, they show whether they are currently in the triggered state (i.e. on):
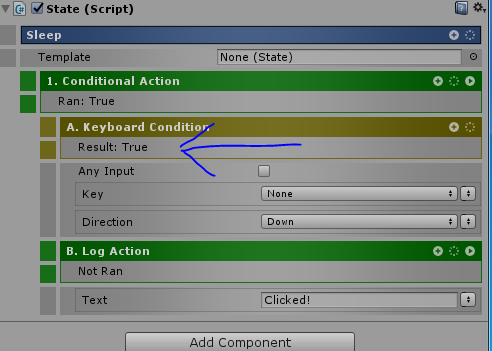
Similarly, Conditions will display their last result as well:
This special action allows you to send a message to the Unity Console. Clicking the message will cause Unity to highlight the Log Action in the hierarchy as well. This can be useful for debugging.
When in Play Mode, instead of the “Initial State” option in the State drop down:
There is an option for Current State:
Selecting that will immediately cause the State Machine to switch to that state.
When in Play mode in the Editor, Actions will gain a new button on their top bar:
You can click this button to run the Action immediately with a default set of targets.
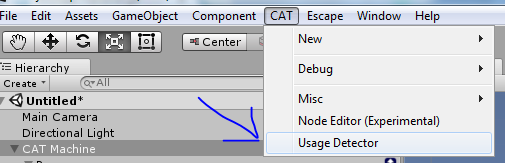
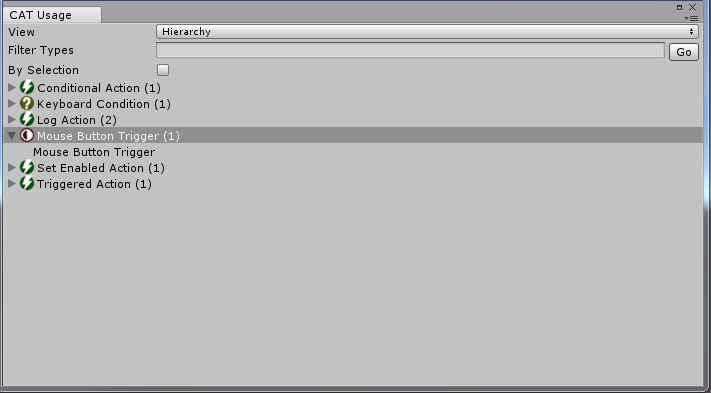
CAT includes a Usage Detector which can show what CATs are being used either in the Hierarchy or the entire project. It is accessed from the CAT menu:
The top section of the detector can be used to search:
When View is set to Hierarchy, only CATs in the Hierarchy are displayed. If By Selection is checked, then only CATs on or below the selection are shown. By entering text in the Filter Types box and pressing the GO button, the displayed CATs can be filtered. Double clicking on a CAT in the window should show it in the Hierarchy or Project window.
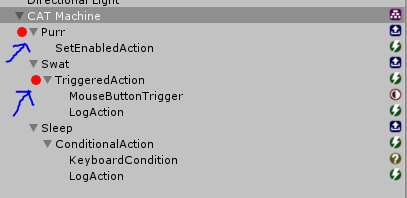
CAT includes a debug mode as well. The easiest way to activate debug mode is to set a breakpoint. Breakpoints can be set on States, Conditions, Actions, and Triggers. When in Play Mode, if a CAT or State is started that has an active breakpoint, the editor will be Paused and the CAT or State will be highlighted in the Hierarchy window. To set a breakpoint, click the square next to a CAT or State as shown here:
Once a breakpoint is set, a marker will show up in the box:
Breakpoints are also shown in the Hierarchy window:
When a breakpoint is hit, the game can be resumed by clicking the pause button:
Breakpoints can be turned off by clicking them in the Inspector. Note that you can not turn breakpoints on or off in the Hierarchy window. Their display there is only for informational purposes.
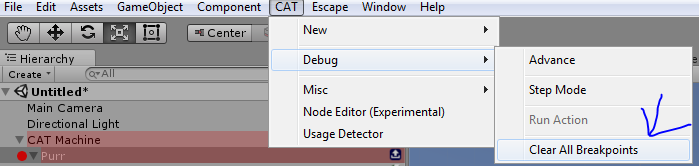
You can clear all breakpoints in the current scene using the menu:
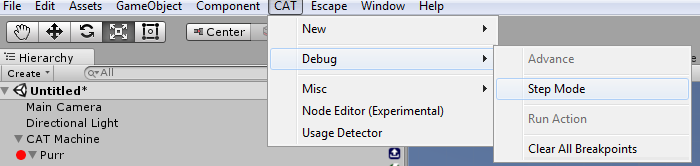
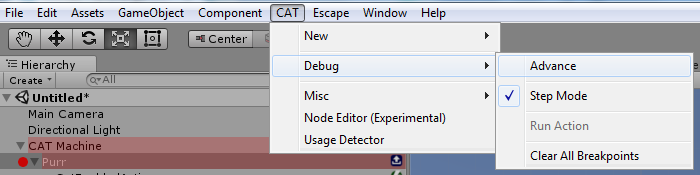
Similar to using Breakpoints, CAT also has a Step Mode. When in this mode, every CAT and State acts as a Breakpoint and will pause the editor when run in Play Mode. Step Mode can be enabled at any time via the menu:
While Step Mode is active, you can use the Advance menu item to unpause the editor and then pause again when the next CAT or State is executed:
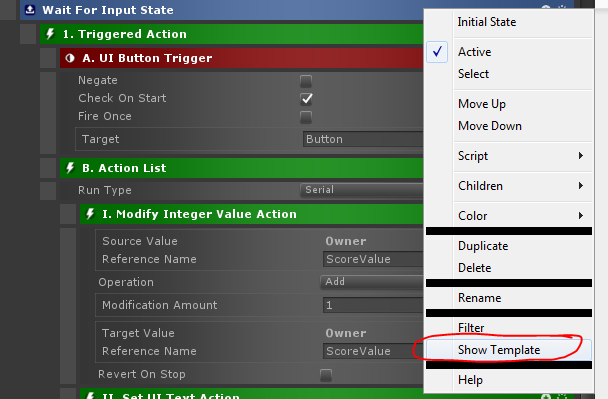
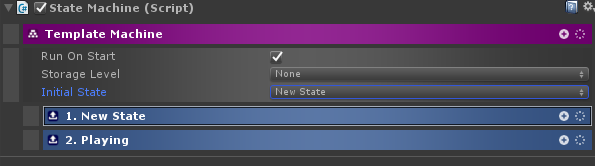
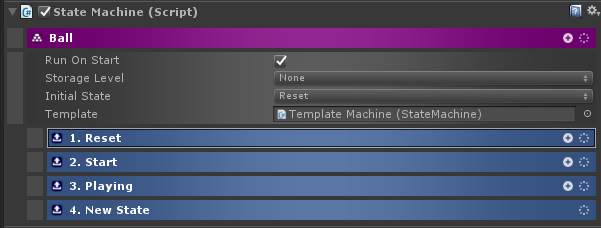
CAT allows the use of Templates in various places in order to improve reuse of work. Templates can currently be used on State Machines, States, and Value Holders. Each of those has an option in the gear context menu to enable a field that takes a prefab to use as a Template:
The above image shows the Template field on a State Machine and State.
The behavior of a Template is different on each type of object. For State Machines, the Template is expected to point to another State Machine. When set, any States defined on the Template are instanced as long as an existing state with the same name doesn’t exist. For example given this State Machine:
And this Template State Machine:
The resulting State Machine is:
Note that the original Playing state remains un-touched and the Playing state in the Template has been ignored.
States can also have Templates. In this case, the Template is another State and all Actions under the Template State are instanced. No Actions are overridden in this case.
Value Holders work similarly to State Machines in regards to Templates. The Template is another Value Holder, and all values defined there are instanced unless a value of the same name already exists.
In order to use some advanced features such as any Services, you must first properly setup your scene. Doing this is simple. You must first add the Conductor. There should only be one of these in your game, and it should be in the first scene that is loaded. To add one, you can use these methods:
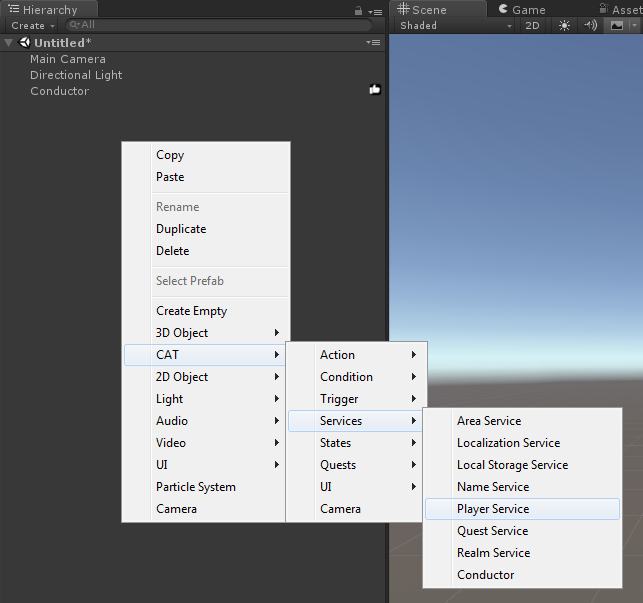
Right click in the hierarchy, or:
The Game Object Menu, or:
The CAT menu.
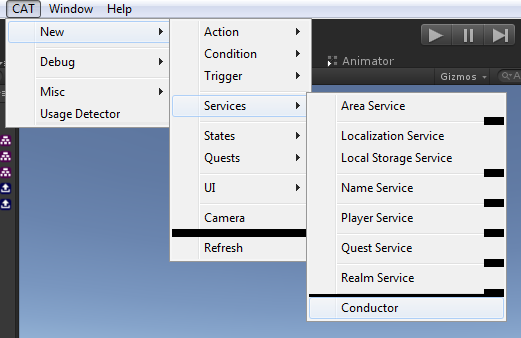
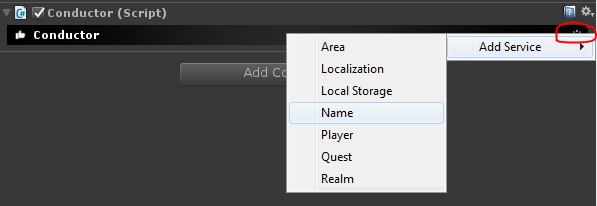
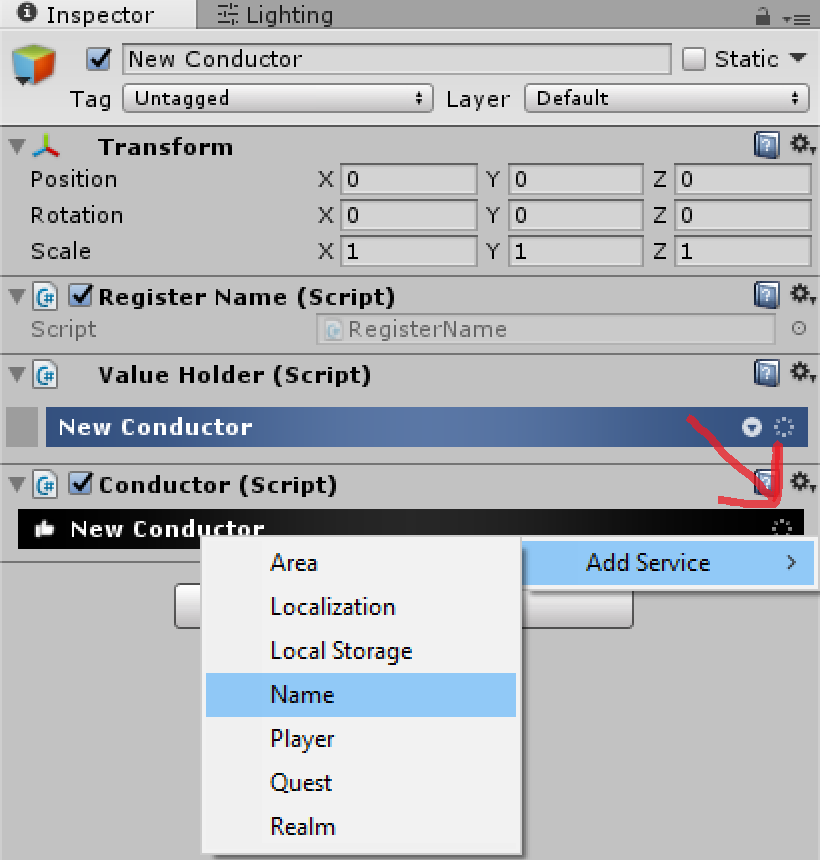
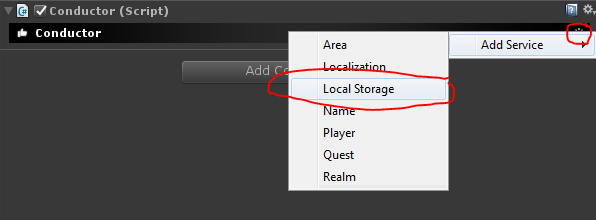
The Conductor that you just added is a key component which manages any Services you may want to add. A Service is a piece of functionality that isn’t necessarily tied to a single Game Object in the scene. Services (and the Conductor) also exist throughout the lifetime of your game typically. Adding a new Service to the Conductor is similar to adding the conductor and can be done from the various CAT menus:
Also via the gear context button on the Conductor in the Inspector:
Technical Info: Services implement an interface based on their functionality. Other code can access services by their interface. This makes it possible to swap out a specific service implementation with another one that implements the same interface. For example, CAT Core comes with a LocalStorageService that implements the IStorageService interface. In the future, another implementation of IStorageService might save the data on a server instead of locally on the device. This new service can be dropped in instead of LocalStorageService without any code changes.
The Name Service allows your CATs to use the Named and Tagged attributes you see on CATarget parameters more efficiently. These attributes work without having a Name Service in your game, but you can expect performance increases if you use many Named or Tagged references in your project. To get started, first add the service using the menu attached to your Conductor:
Once you add your Name Service, you will notice that on your Conductor, a component called Register Name has been automatically added when it was created. This is the same for all Services (except Name Service) and State Machines. What this component does is if there is a Name Service properly attached to a Conductor in your scene, it will register the GameObject to Name Service when the object is created (either on Start or when it is instantiated) and remove it when the object is destroyed (either when the scene is unloaded or when the object is manually destroyed). Then when you reference this GameObject on a CAT using Named or Tagged attribute, it will use Name Service to retrieve the object quickly instead of using slower methods.
While the Register Name component is automatically added to many CAT types, it is not automatically added to every object in the scene. You will still need to add the component to any children of GameObjects that have the component, and any other GameObject that doesn’t have a State Machine, Conductor, or Service component attached to it. To get the best use out of Name Service, only register objects you know are referenced in other CATs via Named or Tagged.
The Storage System provides a way to load and save the state of the game. CAT Core comes bundled with a LocalStorageService. This will save game data on the device that the game is played on. Other future implementations might save on a server or both locally and on a server depending. Using the LocalStorageService is simple. First, add the new Service to your Conductor:
There is no configuration on the LocalStorageService itself; however, now that you have it in your Conductor, you can specify what to save. Several types of things can be saved. One important use of the Storage Service is to save the state of State Machines. All State Machines have several options for storage which are visible when the Storage Level is set to anything other than None:
From top to bottom:
The data that is saved on the State Machine is the current state name, any components (including child components) that are set to save (like a Value Holder), and optionally the position as described above.
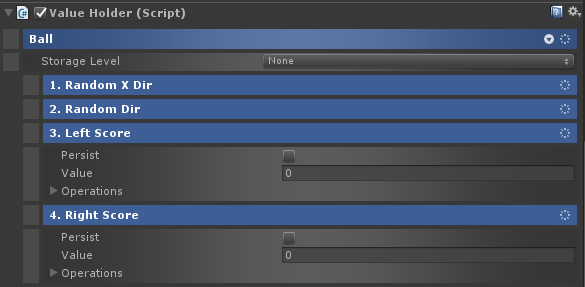
As mentioned, Value Holders can also be saved. This only applies to Values that are defined on the Value Holder and have their Persist flag checked. There are a limited number of options for saving Value Holders:
These work exactly like their counterparts on State Machines.
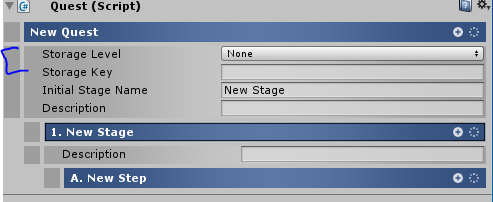
Another user of the Storage Service is the Quest Service. Quest progress is typically saved, and Quests have options similar to Value Holders for storage:
Both these options work exactly the same as Value Holders and State Machines.
The Storage Service also includes several actions.
Load Multiple State Machines Action can be used along with a Template State Machine to load all the State Machines in a given Storage Level and instance the Template for each. You can optionally set the parent Game Object of all the State Machines that are loaded.
Load State Machine Action loads a single State Machine into a Template based on the Storage Level and Storage Key. In this case, the Storage Key must be specified.
Save State Machine Action will save all targeted State Machines as long as their Storage Level is not None.
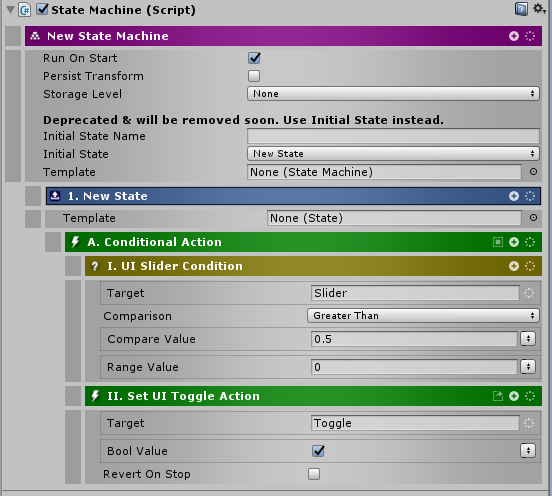
CAT has support for conditions, actions and triggers that can interact with Unity's GUI. They can be found under the UI category when adding CATs to your scene.
There is no UI Service to add to your scene, you can just start adding UI features right away. This example has a condition that will check the value of a UI Slider.
Now you can set the slider’s value before you run your project. Observe that if you have it set to greater than 0.5 and click play, the toggle will be switched on by the condition.
Data Binding
CAT also has built in data binding support. Data binding components can be added to UI components to allow their properties bind to Values.
All data binding components have an optional owner path string. If the owner path is unset, the owner will be set to the same gameobject. If an owner path is set, the owner will be looked up by name in the transform's children.
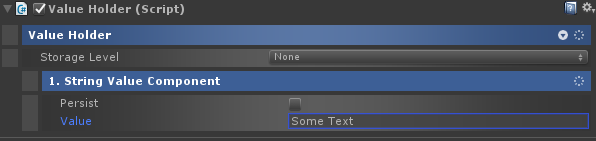
Here is a simple example of how to bind data using CAT:
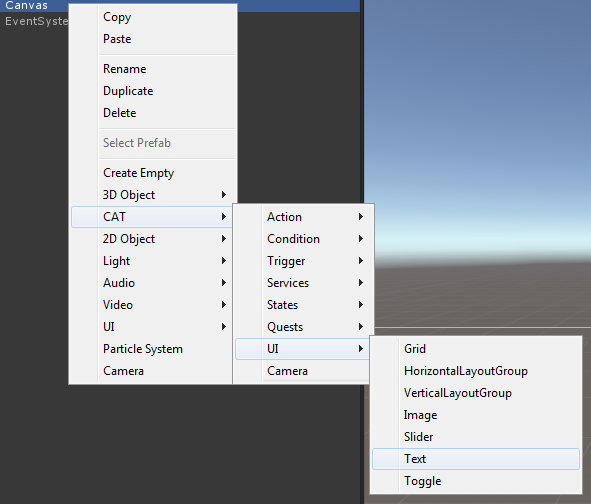
2. Add a Canvas to your scene, then right click on it and select CAT -> UI-> Text.
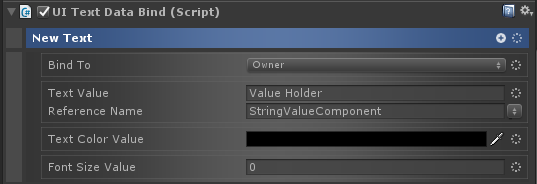
3. A data binding component will be added to the GameObject. Configure it by pointing the Text Value at the String Value you created.
4. That’s it! Run your project and observe that changing the String Value updates the Text field, and vice versa.
When binding directly to properties on objects instead of values in Value Holders, you can change how often the data binding component will check to see if the value has changed by going into the Options and setting the Binding Frequency. Especially when binding to expensive properties, this is best set as high as is reasonable.
Regular CATs are also able to make use of the Data Binding system. If you want to evaluate a value that is only available via a Data Binding Context, you can go into Options and check the Use Binding option. Make sure that the Target is set to a GameObject with a Data Binding component on it, and the reference field is the value you want to check.
Tooltips
All Data Binding components come with the ability to spawn tooltips when the user hover overs the element the component is attached to.
You must assign a UI Element Prefab that will act as the parent gameobject. Then you must set the text value that you want the tooltip to display, either as a string or a reference to a value. This text value will be set to the first Text component found childed to the spawned prefab. The delay is how long in seconds it should take for a tooltip to appear after the user first starts hovering over the element. The Parent is the Transform the Prefab should be childed under, and finally the offset is how far away the tooltip should appear from the cursor.
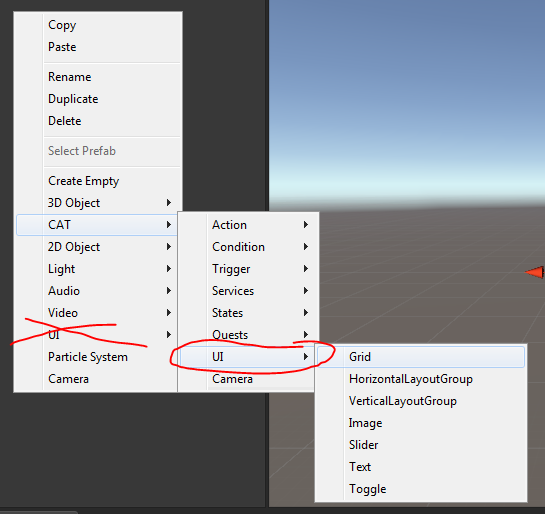
Grids/Layout Groups
With CAT's data binding features, you can create UI grids/layout groups that will automatically instantiate a child prefab and bind some data for you. Here is an example of how this is achieved:
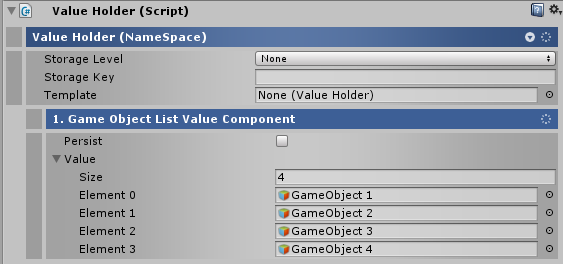
1. Create a Value Holder and add a GameObjectList to it. Create some Game Objects in your scene, give them unique names and then assign them to your GameObjectList.
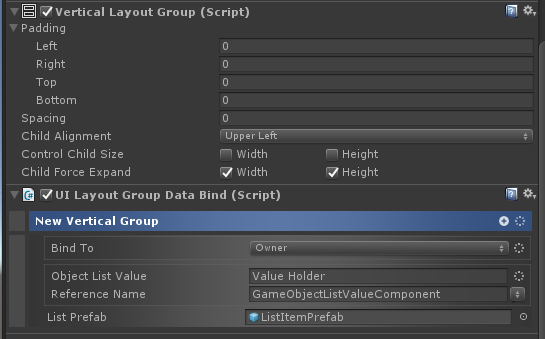
2. Create a Canvas, then add a child to it with a Vertical Layout Group component.
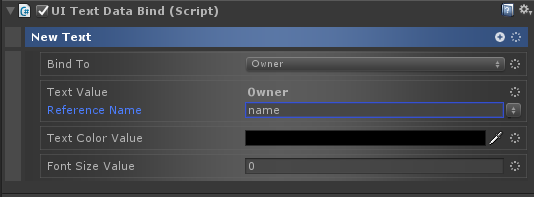
3. Create a UI prefab to be used as a list item. Add a Text Field and UI Text Data Bind component to it. Set the Text Data Bind's text value to be owner, with a reference name of 'name'
4. Add a UILayoutGroupDataBind component to the GameObject with the vertical layout group on it. Set the object List Value to named and enter the name of your GameObjectListValue. Also drag your prefab into the List Prefab reference.
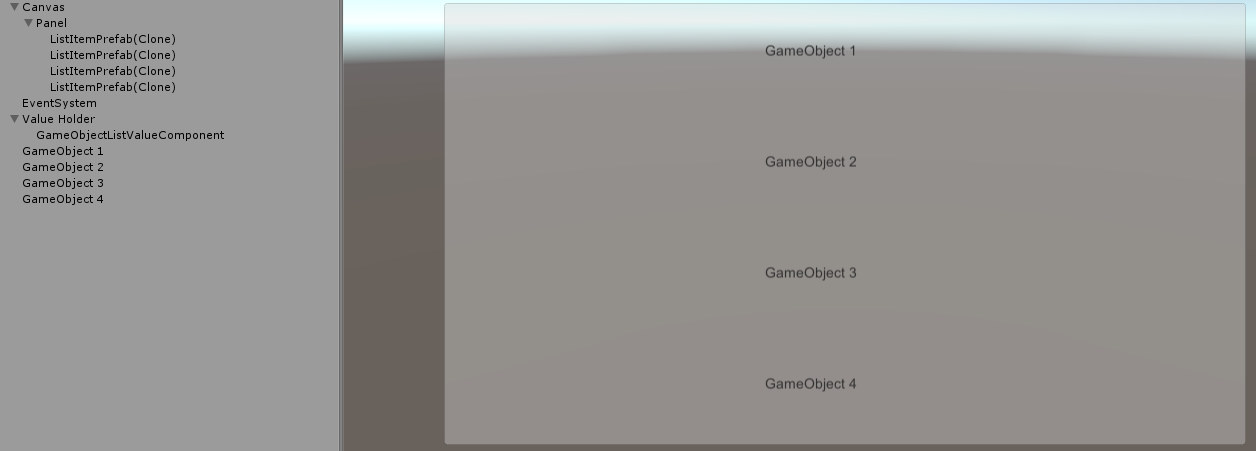
5. Press play and see that your vertical layout group was populated with copies of the prefab. The text field on these children will now be populated with the names of the Game Objects from the list.
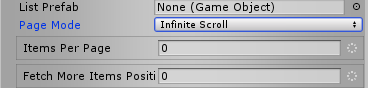
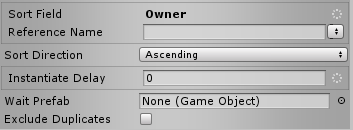
The Layout Data Bind also support displaying the data either as an infinite scroll or in a page format. To set this up, look towards the bottom middle of the component for these fields:
There you are able to set the type of paging you want (normal, infinite scroll, or pages), how many items to display on each page and when the component should start fetching more items in a scrolling page.
There are other useful features built in such as sorting of any type of field or property, delaying the spawning of each item, spawning in a loading UI Element while the layout is being built, and excluding duplicates items from the list based on their name.
It is possible to filter the results in the list by adding Conditions as children of the UI Layout Group Databind object. For each item in the list, the conditions will be checked. Owner will be set to the list item. If any of the conditions fail, then the item will not be displayed.
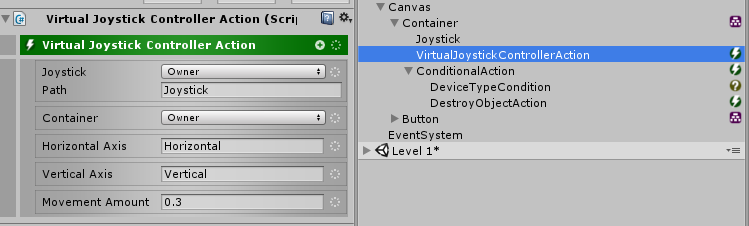
The built in CAT Virtual Joystick allows you to make simple touch screen controls for your games!
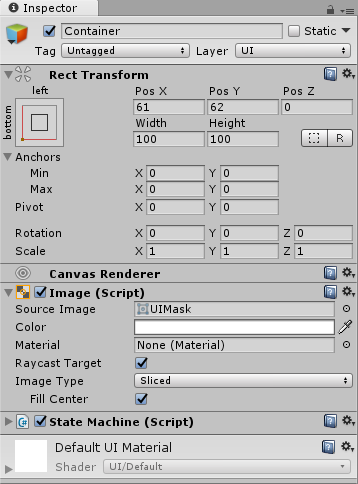
To set up the virtual joystick, all you need to do is make a container GameObject underneath a Canvas. On that GameObject, you will want to attach an image component that will serve as a background, and a State Machine to make the CAT we are going to child to this GameObject work.
Then underneath that Container you will need a GameObject with a centered image that will serve as the “Joystick” for your virtual joystick and a VirtualJoystickControllerAction. You will want to point the CATargets Joystick and Container to their relative GameObjects and the rest of the fields depend on your input setup and how you want the joystick to feel.
NOTE: The Virtual Joystick pairs especially great with a DeviceTypeCondition which can detect if you are running on a mobile platform or not, and then enable or disable the UI controls. In the picture above, the Device Type Condition is set to Mobile and the Negate option is checked. This will make it so the Container will be destroyed if you are not playing on a mobile platform.
There are multiple Actions that come with CAT that allow you to send data to your Unity Analytics dashboard with ease. There are multiple actions for the different types of Analytics Events that Unity allows you to post, such as Screen Visited, First Interaction, Tutorial Completed, and Store Opened.
All Analytics Actions can have CAT Value Components added underneath them similarly to how a ValueHolder works. The values of all of these will be sent as custom parameters to the event.
Note, this requires you to set up your own Unity account and dashboard before you are able to use Analytics. Also, Analytics is only supported in Unity 2017.3 and above.
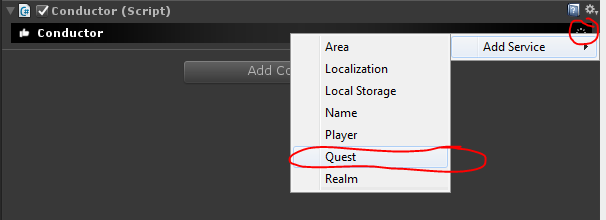
The Quest Service is for directing the Player to perform various actions and rewarding them for doing so. In addition to the typical RPG quest, it can also be used for First Time User Experiences, Achievement tracking, and likely many other uses. After creating a Conductor as described above, you can add the Quest Service to your game through the usual CAT menus or via the gear context menu on the Conductor:
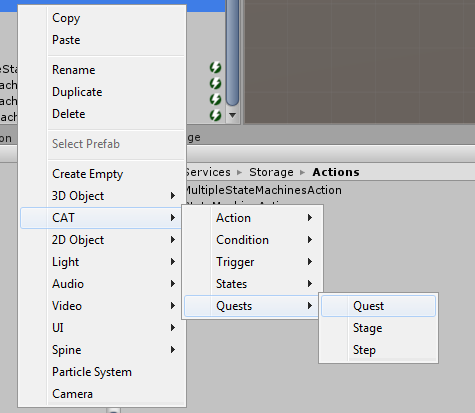
The Quest Service itself doesn’t have any configuration. Quests can be constructed and saved to Prefabs for use. To do that, right click in the Hierarchy and select CAT->Quests->Quest:
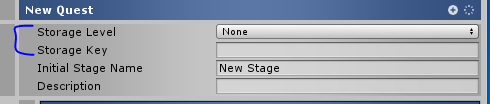
Quests are made up of three main components, the Quest, Stages, and Steps. Quests have one or more Stages, and you can think of a Stage similarly to a State in a State Machine. Each Stage must have one or more Steps. Steps are the actual tasks that must be completed, and the Quest system keeps track of which Quests, Stages, and Steps are active or have been completed. Quests also have an Initial Stage Name which is similar to the Initial State Name of a State Machine and denotes the first Stage the Quest begins on.
Quests, Stages, and Steps can be in one of multiple states:
Each level may also have 0 or more Start, Stop, and Complete Actions. Start Actions are started when the quest part turns Active and are stopped when it becomes Inactive or Complete. Stop Actions are started when the quest part moves from Active to Complete or Inactive. Stop Actions must not be continuous. Complete Actions are started when the quest part moves from Active to Complete. These are typically used to reward the player or jump to a new stage in the quest. Extra icons show up on the top bar of Actions to determine if they are Stop or Complete actions:
Using Quests requires that a Storage Service (such as Local Storage Service) is present. There are options on Quests pertaining to storage:
These options function the same way as they do on Value Holders. See the reference in the Storage Service section for more info.
Quest Steps have an additional component, which is their Complete Triggers. These are Triggers that are children of the Step. When any one of these triggers fires, the Step may be completed (or the remaining count is decreased-- see below).
Quest Steps have several other options:
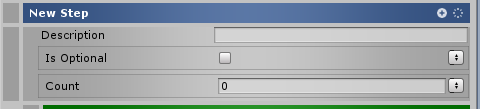
The Is Optional parameter determines if this Step is required to mark the Stage as complete. If checked, the Stage can be completed without completing this Step. Often, optional Steps can be used for branching by adding a Complete Action that changes the Quest Stage when an optional Step is completed.
The Count option specifies how many times the trigger must fire in order for the Step to be marked complete. This is useful for cases such as “Kill 5 spiders”.
All quest parts also have a localized name and description which can be displayed to the player in the quest log or elsewhere.
Quests can have an additional set of Grant Conditions. These are Conditions which are children of the Quest. Whenever the Quest is granted to a player, if any of these Conditions are not true, the Quest will not be successfully granted. This can be used to only grant the Quest to players within a specific level range for example.
The Quest Service includes many CATs to manage Quests as well:
Change Quest Stage Action can be used to change the current Stage of an active Quest. The previously active Stage will be set to Inactive and the new one will be set to Active.
Complete Quest Action will immediately mark an Active Quest as Complete. The Complete Actions from the active Steps, Stage, and Quest will be executed as well.
Grant Quest Action will check the Grant Conditions of the specified Quest, and if successful, it will grant the Quest to the player. When this happens, the Quest will be instanced, become Active, and the initial Stage and its Steps will also become Active.
Remove Quest Action will remove an Active Quest without completing it. The active Steps, Stage, and Quest will be set to Inactive.
Is Quest Active Condition checks if a specified Quest is currently Active.
Is Quest Completed Condition checks if a specified Quest has been Completed.
Is Quest Stage Active Condition checks if a specified Stage on a Quest is currently Active.
Is Quest Stage Completed Condition checks if a specified stage on an Active Quest has been Completed.
Is Quest Step Active Condition checks if a specified Step on a Quest is currently Active.
Is Quest Step Completed Condition checks if a specified Step on an Active Quest has been Completed.
Quest Active Trigger triggers when the specified Quest becomes Active.
Quest Stage Active Trigger triggers when the specified Stage on a Quest becomes Active.
Quest Step Active Trigger triggers when a specified Step on a Quest becomes Active.
The localization service allows for the localization for any string element in the game, UI or in-game.
Creating Locales
For the localization service to function first we need to create a language or locale, and set up the language collection.
Once the Locale and Locale Collection are configured we need to set up the scene elements.
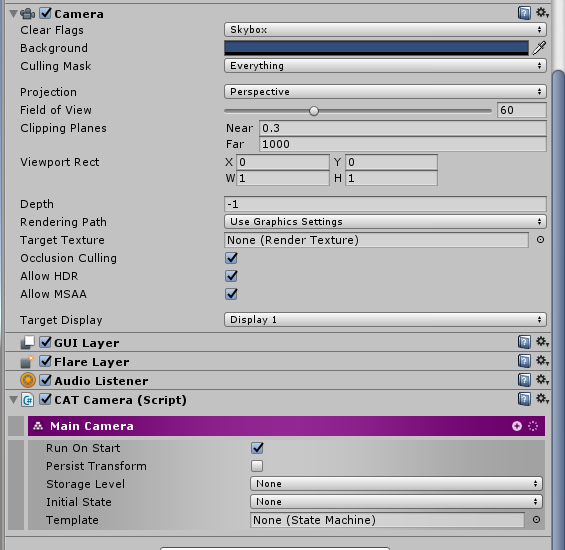
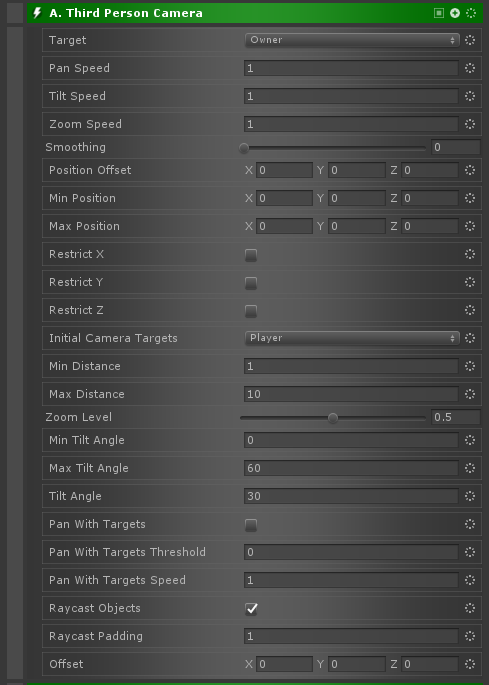
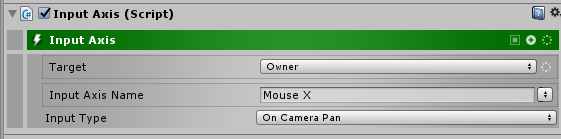
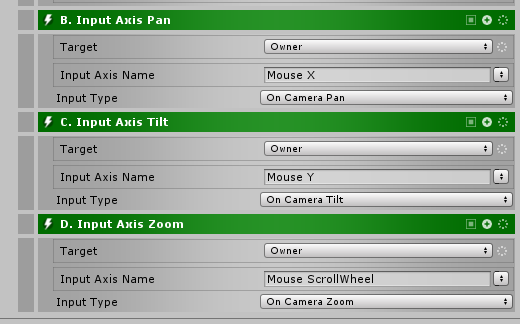
CAT provides building blocks for creating camera behaviors. CATCamera is a special state machine that can be attached to a Unity camera. CAT's camera features and input maps can then be added to the camera's state to create custom camera controls.
Example
Camera Actions
There are also some actions that can be used to affect cameras in CAT. Adding to the above example:
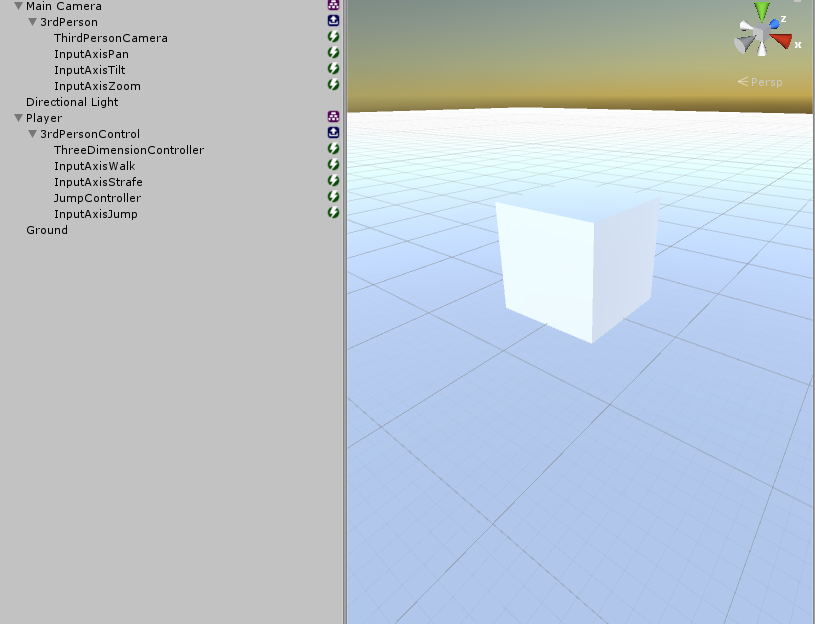
The player controller system can be used with the camera system to quickly and easily create custom player controls. Player controllers can either use physics or Unity's Character Controller component to move, and can be used in 2D or 3D. The example below builds on the scene created in the camera example above.
Example
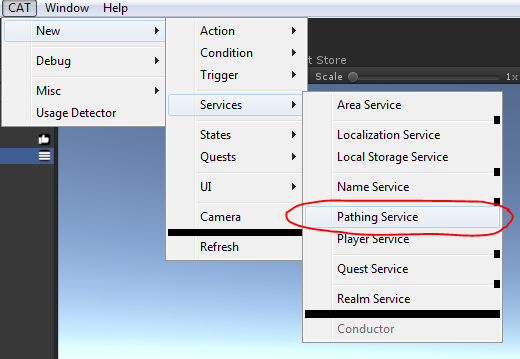
The Pathing service provides a lightweight node-based pathfinding system. This can be especially useful in 2D games where Unity’s built-in navmesh is not helpful. Node-based pathfinding systems work by placing nodes in the scene and linking them to create a graph of potential paths. To use CAT’s Pathing system, you’ll need to add it to the scene:
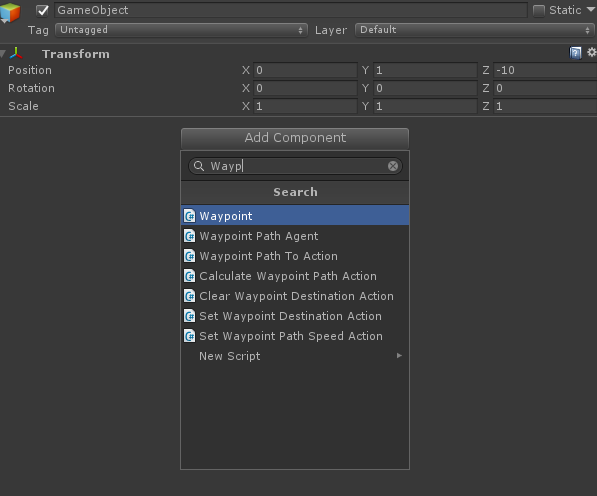
If you don’t already have a Conductor, this will add one of those as well. There’s nothing to configure on the new PathingService GameObject. However, we need to add some waypoints. To create the first one, make an empty Game Object and add the Waypoint component to it:
Duplicate the first one so that you have two. Move the second one away from the first. Now you can link them up. Currently, linking is a manual process. To do that, select the first Path Node and change the Size field under Neighbors to 1. Then drag in the second Path Node:
Do the same for the second Path Node except drag in the first:
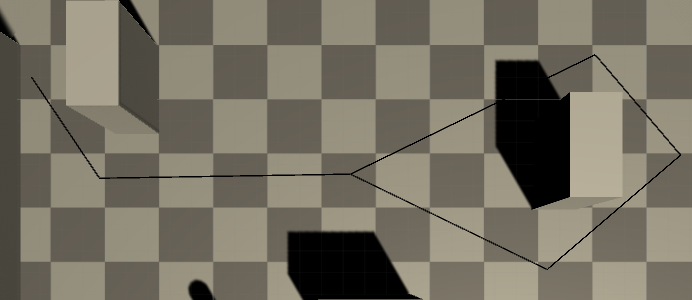
Add a few more Path Nodes and link each up to nearby ones that can be moved to directly. Make sure that you link the nodes in both directions. Otherwise you’ll create a one-way path (which can be desirable in some situations). As you’re doing this, you’ll notice in the Scene view that the Path Nodes are connected by lines:
Once you’re satisfied with the network of Path Nodes, you can create a new State Machine which will path along them. You can optionally add a Waypoint Path Agent to this State Machine, but if you don’t, one will be added automatically at runtime.
The benefit of creating this beforehand is to have the option to set the default walk speed. Now we can add some Actions to make the new State Machine move along the path. For this, there’s Waypoint Path To Action. This Action will cause the target(s) to path to a location using the Waypoint Path System. The difference between Waypoint Path To and Set Waypoint Navigation Destination is that Waypoint Path To will continue running until the target(s) reach the destination.
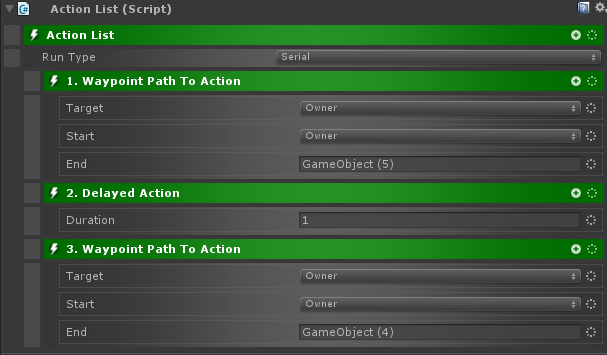
Waypoint Path To Action takes a Start and End CATargetPosition. Usually the Start field should be the same as Target. The End can be a reference to a Waypoint or just a position. You can also use the Mouse position to allow for clicking on the destination. Let’s try something like this:
With those actions, the new character will path to Waypoint 5, wait 1 second, and then path to Waypoint 4.
Additional Actions:
Calculate Waypoint Path - This can be used to calculate and store a path in a Float List Value. Useful if you want to stop at each waypoint or determine if it’s possible to path somewhere.
Clear Waypoint Destination - If the target(s) currently have a destination, it will be cleared and they will stop where they are.
Set Waypoint Destination - The target(s) will move towards the destination. This Action finishes immediately.
Set Waypoint Path Speed - Sets the walk speed of a Waypoint Path Agent.
Waypoint Path To - Similar to Set Waypoint Destination except the Action continues to run until the agent reaches the destination.
The Player service keeps track of Characters and Accounts. It is currently included in CAT for the purpose of future expansion, and is not intended for production use without additional work.
The Realm service keeps track of Realms, which are large portions of a game world that include multiple Areas. It is currently included in CAT for the purposes of future expansion, and is not intended for production use without additional work.
The Area service keeps track of Areas, which are smaller portions of a game world that can be thought of as Scenes or Zones. It is currently included in CAT for the purposes of future expansion, and is not intended for production use without additional work.
This service is required to use the Asset Bundle feature of CAT. Asset Bundles are a way to provide your game with additional assets that aren’t part of the initial download. They can be used to reduce download size, provide DLC, or to extend or update the game data after release. The service itself has several options:
The Bundle Downloader points to a Scriptable Object which must derrive from the AssetBundleDownloader class. There are two provided with CAT: Local Bundle Downloader and Web Bundle Downloader. Typically, Local Bundle Downloader is used for testing while in development so that local Asset Bundles can be used instead of ones hosted on a web site. The Web Bundle Downloader will download bundles from any url (http, https, file, or any other protocols Unity supports).
The Build Asset Bundle Options is directly passed to Unity when the bundles are built. See their documentation on the subject for more info.
Bundle Output Directory specifies the path (starting at the project root) where the bundles will be created. This defaults to Assets/StreamingAssets and if the folder does not exist, it will be created.
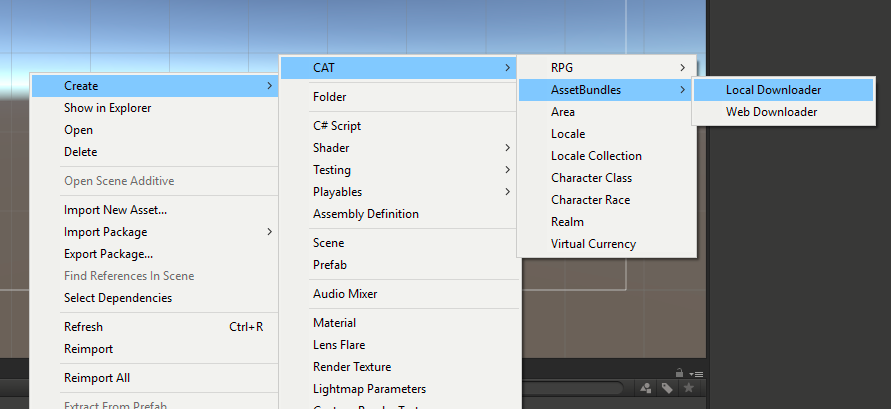
To add a Bundle Downloader, select a folder in the Project window and right click to this menu:
The Local Bundle Downloader only has one option, which is the Base Path from which the bundles will be loaded. This defaults to Assets/StreamingAssets.
The Web Bundle Downloader also only has one option, which is the base URL from which the bundles will be loaded.
To add items to an Asset Bundle, select the asset in the Project Window and at the bottom of the inspector is an Asset Bundle configuration:
Use this to define bundles for your project and to set the bundle for the asset.
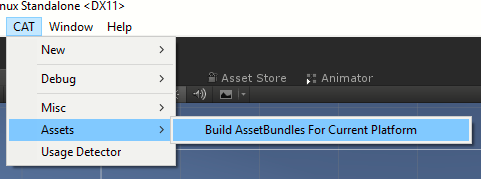
Before using Asset Bundles or any time the underlying assets have changed, the bundles must be built. This can be done through the CAT Menu:
Selecting that option will immediately start the bundles building. For some projects, this may take some time.
Asset Bundles must be loaded before they can be used. To do this, use the Load Asset Bundle Action:
This Action takes a Filename (which should correspond with the Asset Bundle name) and an optional CRC. If the CRC is specified and the Web Downloader is being used, then the CRC of the bundle will be checked before downloading. If the user already has downloaded the bundle with the same CRC, then the cached version will be used.
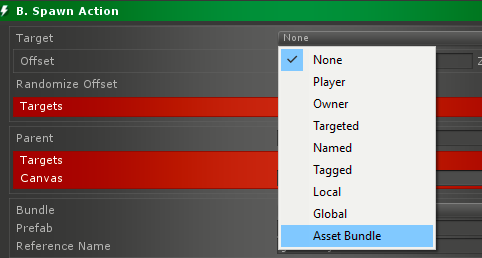
Once downloaded, the assets in the Bundle can be used from any CATarget using the Asset Bundle option:
This causes two fields to display:
The Bundle field is a drop down that contains all the defined Asset Bundles for this project. The other value (“Prefab” here, but it uses the name of the field) should specify the filename of the asset within the bundle without its extension. Once this is set, the CATarget will point to this object (assuming it’s a GameObject / Prefab) and the CAT it is in will function as normal.
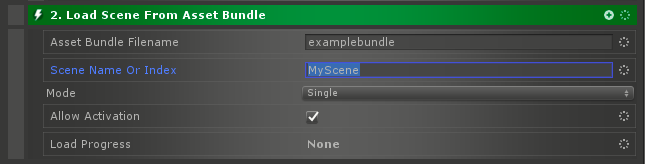
Another feature of Unity’s Asset Bundles is that they can contain Scenes. This is particularly useful to add additional levels to a game or to allow modification of the game without users having to update. To do this, just select a Scene file and set its Asset Bundle property accordingly. Then use the Load Scene From Asset Bundle Action:
As before, the Asset Bundle Filename should match the name of the bundle. The Scene Name Or Index can either be the name of the Scene or its index in the bundle. Using index 0 in a bundle that has only one scene is the best use case for this since it allows the game to ignore the name of the scene and just load what’s in the bundle. The other options are the same as from the Load Scene Action.
Things that will definitely be a problem:
CAT Game Builder comes with many included examples. They are based in the TrickyFast/Examples folder by default. The Hello World Example and Value Example are covered in the beginning of the manual.
The Example Browser is the best way to explore all the included examples. It can be found in TrickyFast/Examples/ExampleBrowser/ExampleBrowser.unity. While it doesn’t show off any features in particular beyond some basic scene loading, when run, it shows all the examples and provides buttons to load them. Use the Escape key (or back button on Android) to return back to the browser from one of the other examples.
The Balance example shows a simple physics-based game where you balance toilet paper rolls on a plunger in a bathroom. It can be found in TrickyFast/Examples/Balance/Balance.unity. Drag the toilet paper roll with the mouse or by touch and place it on the plunger. Be careful not to knock it over!
This example shows off building a physics based game with CAT Game Builder. It also demonstrates using Values to keep score, spawning new objects with the Spawn Action, and cleaning up pieces using the Destroy Object Action.
The Brick Breaker example demonstrates a simple arcade brick breaker game. It can be found in TrickyFast/Examples/BrickBreaker/BrickBreaker.unity. Use the arrow keys, A & D keys, or a gamepad to move the platform from side to side. This example shows how to enable and disable components.
There are several scenes in TrickyFast/Examples/ControllersExample/Scenes which show off usage of various types of Camera and Player controllers.
This example shows a first person Camera Controller with a physics based 3D Player Controller. Use the mouse to angle the view and WASD or the arrow keys to navigate. Spacebar jumps. A gamepad can also be used for movement. The mouse wheel zooms in and out.
This is similar to the First Person Controller Example except the Player Controller uses Unity’s built in Character Controller instead of being physics based. Use the mouse to angle the view and WASD or the arrow keys to navigate. Spacebar jumps. A gamepad can also be used for movement. The mouse wheel zooms in and out.
This example uses a NavMesh based Player Controller along with a 3rd Person Camera Controller. The camera can be rotated (around the player) using WASD, the arrow keys, or a gamepad. The mouse wheel zoom in and out. To move, click on the ground with the mouse.
The Side Scroll Controller Example shows off a 2D Camera Controller and 2D Player Controller both set into Side Scrolling mode. A and D keys, the arrow keys, or a gamepad can be used to move right and left. Space bar or a gamepad can be used to jump (double jump is allowed). The mouse wheel can be used to zoom.
This example is similar to the Side Scroll Controller Example except its 2D Player Controller uses Unity’s built in Character Controller instead of being physics based. A and D keys, the arrow keys, or a gamepad can be used to move right and left. Space bar or a gamepad can be used to jump (double jump is allowed). The mouse wheel can be used to zoom.
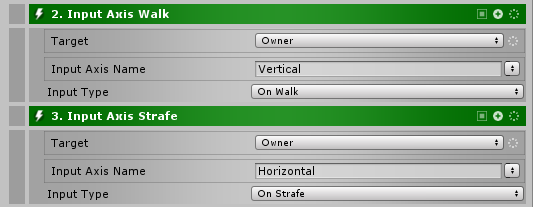
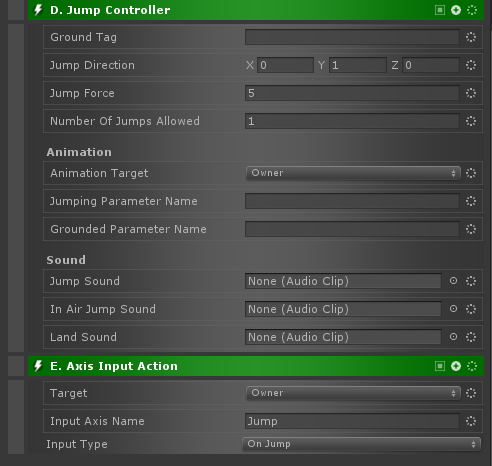
This shows a 3rd Person Camera with a standard 3D Player Controller. WASD, the arrow keys, or a gamepad can be used to move forward, backward, or strafe. The mouse will rotate the camera, and the mouse wheel zooms in and out. Space, or a gamepad can be used to jump.
This example is similar to the Third Person Controller Example except the 3D Player Controller is using Unity’s built in Character Controller instead of being physics based. WASD, the arrow keys, or a gamepad can be used to move forward, backward, or strafe. The mouse will rotate the camera, and the mouse wheel zooms in and out. Space, or a gamepad can be used to jump.
In this example, a 2D Camera Controller and a 2D Player Controller are used, both in top down mode. WASD, the arrow keys, or a gamepad can be used to move the character. Space or a gamepad can be used to jump. The mouse will rotate the view, and the mouse wheel zooms.
This is similar to the Top Down 2D Controller Example except the 2D Player Controller is using Unity’s built in Character Controller instead of physics. WASD, the arrow keys, or a gamepad can be used to move the character. Space or a gamepad can be used to jump. The mouse will rotate the view, and the mouse wheel zooms.
Flappy Penguin is an endless flyer game where a penguin has attached cardboard wings to himself and is trying to fly between some icicles. This example is located in TrickyFast/Examples/FlappyPenguin/Main.unity. The only control is hitting Space bar, the mouse button, or tapping the screen to flap.
This game shows off building an object pool using CAT Game Builder, randomizing spawn positions, using sound effects and music, and very basic persistence (the high score is saved).
This is a clone of the classic arcade game of the same name. Pong can be found in TrickyFast/Examples/Pong/Pong.unity. It is intended to be a very basic example game that should be easy to examine and learn from. Use the mouse or touch input to control the left side paddle.
Pong shows off basic State Machine usage, mouse position tracking, generating random Vector Values, and just generally how little work needs to be done to have a functioning game in CAT Game Builder.
This is an example Role Playing Game built in CAT Game Builder. It can be found in TrickyFast/Examples/RPG/CAT-RPG.unity. This and the side scroller are two of the most complicated example games. The controls are simple. Click the ground to walk to a point, and hold shift to run. To interact (talk, open chest, attack), click.
The RPG game shows off the Quest System, advanced persistence, complex data binding through its on screen quest status indicator, data-bound UI layouts such as the quest log window, Adaptive Music that changes when the character is threatened, sound effects, advanced animation handling, and health bars. There are quite a few other features shown off in this example, and it is definitely worth examining!
This example 2D side scrolling game shows how CAT works in a more complex 2D environment. Its main scene is in TrickyFast/Examples/SideScroller/Scenes/SideScroller-Main.unity. For controls, use A and D, the arrow keys, or a game pad to move left and right. Space bar or a gamepad will jump (double jumping allowed). Collect all the orbs in a level to win. Jump on enemies (SoftServe) to defeat them.
This is another advanced example like the RPG example. Some of the features it shows off are more advanced scene usage, advanced Value usage, some advanced camera features, advanced animation handling including jumping and landing animations, and many others. As with the RPG example, intermediate and advanced users will likely benefit from closely examining how the various elements fit together.
For anyone familiar with C#, creating new CATs is a simple process. The steps are basically, subclass the appropriate class, provide implementations for abstract / override methods, optionally add Validation, CATegory, and description.
One thing to note is that CAT Game Builder makes extensive use of Deferreds. A Deferred is a way of promising a future value by way of callbacks. They’ve been around a long time and are sometimes called a Promise. CAT’s Deferred instance follows the same functionality and API of the one from Twisted. The documentation for that can be found here: https://twistedmatrix.com/documents/16.5.0/core/howto/defer.html
When defining parameters to CATs, it is always best to use their Value forms. For example, instead of a string, use a StringValue as the parameter type. The benefits include the ability to be set as a reference and using data binding.
The main CAT classes are CATCondition, CATAction, CATInstantAction, CATYieldAction, and CATrigger.
To create a new Condition, just subclass CATCondition and implement DoCheck. The owner and targets arguments passed in provide the context as explained in the Targeting section. The newTargets argument should be filled with any new targets that are picked up by the condition. For example, a proximity condition might add the object that entered the proximity as a newTarget. The return value is Deferred to account for asynchronous Conditions (such as those that query a value on a server), but to return immediately, just return either Deferred.Succeed(true) or Deferred.Succeed(false) depending on whether the Condition passes or fails. Note that Deferred.Fail should not be used to indicate the Condition failing. Deferred.Fail implies there was an exception retrieving the value of the Deferred.
CATAction
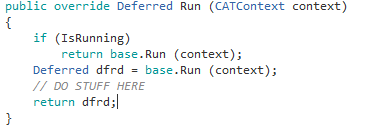
Usually it is best to use a subclass of CATAction such as CATInstantAction, but in some cases, an Action will become instant depending on its parameters. In this case, subclassing CATAction is the way to go. Typically, you’ll want to override IsContinuous to return whether the Action is Continuous. Then, either override Run and Start, or add an Update. In Update, you can check the IsRunning bool to determine if the Action is currently active. The only way to stop a running Action is to call Stop. This is required to be called even if the action is completed on its own (for example by reaching a destination position). Calling Stop notifies the code that ran the Action that it has finished. It does this by calling back the Deferred that is returned in Run.
When overriding Run, it is important to call the base class version and to properly handle the returned Deferred. It is also important to check if the Action is already running. A good template to use when overriding Run is as follows:
The reason not to return base.Run(...) at the end of the function is because it is possible something in the DO STUFF HERE section will call Stop. If that happens in that case, nothing will happen since the Action isn’t running until base.Run(...) is called. Then the Action will start and never stop.
Similarly, when overriding Stop(), always call base.Stop() and check to make sure the Action is running. A good template to use when overriding Stop() is as follows:
There are less gotchas with overriding Stop, but it is generally advisable to return base.Stop() as the last line. That way, the code that started the Action will be notified after everything is finished and cleaned up as opposed to potentially in the middle of cleanup.
CATInstantAction
Many times, an Action will always be instant no matter what parameters are set. In this case, subclassing CATInstantAction simplifies the implementation. Here, the only thing to override is DoAction, which takes the context of owner and targets.
CATYieldAction
When building an Action that may run over several frames that can be implemented using a Coroutine, subclassing CATYieldAction is the right way to go. In this case, you override DoAction, which is a Coroutine that takes the context of owner and targets.
CATrigger
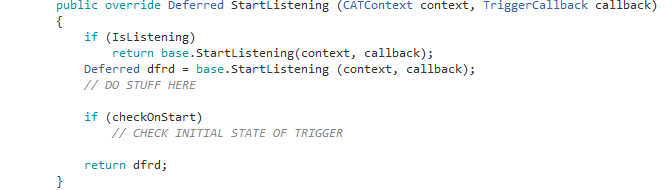
To make a new Trigger, CATrigger should be subclassed. Typically, StartListening and StopListening are overridden, though sometimes like Actions, just adding an Update can be enough. StartListening is called when the Trigger becomes active, and StopListening is called to deactivate it. In order to set the state of the Trigger, call the Fire method with the state and a list of new targets.
When overriding StartListening, it is important to follow similar conventions to overriding Run for Actions. First, check if IsListening is true, and if so, return base.StartListening(...). Then, cache the returned Deferred from base.StartListening(...), call your own code, and then return the cached Deferred. An additional concern is the checkOnStart flag. While this isn’t appropriate for all Triggers, it should be respected when possible. If checkOnStart is set, then in StartListening, you should check the current state of the trigger and call Fire() if it is triggered. A template of StartListening is below:
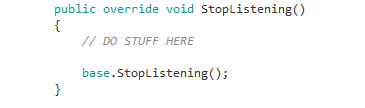
StopListening should be implemented similar to Stop() on Actions. You should check IsListening and if it is false, immediately return. Otherwise, call any clean up code and then end with base.StopListening(). Here’s an example:
It is not required for Triggers to Fire(false, …) after firing with true, though most Triggers will want to do that. Cases where it isn’t advised are ones where the triggered status is instant such as receiving an event.
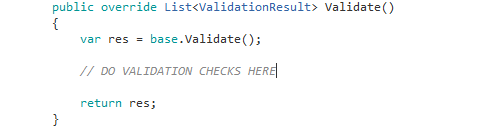
Validation is an important part of CAT. It shows users when there are warnings or errors with the parameters they’ve set up. Conditions, Actions, and Triggers all have a Validate method which can and should be overridden in subclasses. Here’s a bare bones implementation:
Things that should be validated include CATargets, Values, and CATargetPositions. There is a convenience function which will validate any attribute of the class which is IValidatable (which all those are). This is ValidateField. Usage is easy, just add the results of calling ValidateField with the name of the field as a string to the list of Validation Results.
The above example validates attributes named buttonName and direction.
Now, since Values and CATargets may sometimes only have meaningful values during runtime, it’s not always possible to do a lot of extra validation on them. However, for CATargets, you may want to check if the target type is set to None in case that doesn’t make sense. Here’s an example of doing that and then using the convenience function ValidationResult.Warning to add a warning:
There is also a ValidationResult.Error for errors. The arguments to both are:
A similar trick is often useful with Values to check numeric ones in particular to make sure they’re in the proper range. While we can’t check them if the Value is set to be a reference, we can check them if not. Here’s an example:
In this case, we’re making sure “delay” isn’t a reference and then directly checking that the value isn’t negative. If it is, we add an error.
Some projects may have existing systems or third party plugins that would benefit from a CAT integration. There are many ways to accomplish this, and the best route will depend on the system to be integrated. Often, it’s possible to integrate a system by just writing some CATs that interact with it. This can be the simplest method.
Let’s use a generic dialogue system as an example. The dialogue system probably has a function to play a dialogue tree and another to activate a callout or similar. The most basic integration would be to implement an Action for each with a pointer to the dialogue to display and possibly a CATarget to denote what character the callout is displayed over. If the dialogue system also tracks which NPCs or dialogue was displayed, one could also add a Trigger that fired when the player talked to a specific NPC or was shown a specific dialogue line. This would be especially useful for Quests. Another useful thing would be a Condition to check that as well
For a more complicated integration, sometimes building a service might be required. This is especially useful to replace or extend an existing CAT service. For example, CAT comes with a minimal Localization Service. Some games might use their own Localization system or a third party one. In those cases, it is still possible to use Localization within CAT if you implement a new ILocalizationService. This implementation should also be a MonoBehaviour. To use it, just add it as you would any other service under the Conductor.
When the existing system to integrate has a central component, it’s usually a good idea to make a new Service for that. To do that, first create an interface that inherits from IService that defines your Service’s API. Then, create a MonoBehaviour class that also implements that interface. The IService interface is fairly simple and only includes two methods: initialize and stop.
Initialize is called during Awake of the Conductor. This can be used to initialize any data for the service, but keep in mind that other services might not be initialized yet. In order to make sure all services have been initialized before executing any code, pass a callback to Conductor.getConductor().CallOnInitialized(). That callback will be called after initialization is complete.
The other method from the IService interface is stop. This is simply a place to add any cleanup code for your new service.
Once you’ve implemented your service, you’ll need some CATs to interact with it. Here’s an example showing how to get the IQuestService in a CAT (a CATInstantAction in this case):
The key component there is conductor.getLocalServiceByInterface. It’s important to always reference services by their interface. This allows the actual service implementation to be swapped out without any other code changes.
In order to build higher level CATs, it’s often advisable to create new systems to support them. Additionally, building CATs into traditional game systems can speed up implementation and increase flexibility. Finally, building new systems is sometimes necessary in order to reduce the complexity of building the system using only CATs.
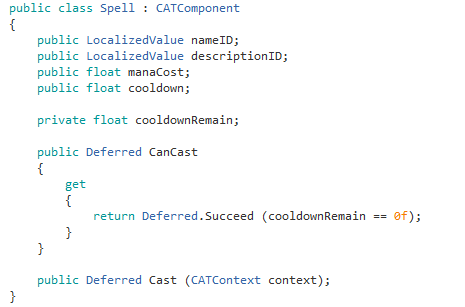
An easy to follow example system might be a spell system for an RPG. Spell systems are typically fairly complex and need to support many variations of spell effects, but they have some required functionality for every spell such as mana cost and cool down time. Spells also have to collect targets and then apply effects to them. For simplicity, let’s just think about spells themselves and not how to store what spells the player has. One way to do this would be to build the Spells out of Monobehavours. Here’s what a bare bones Spell class might look like:
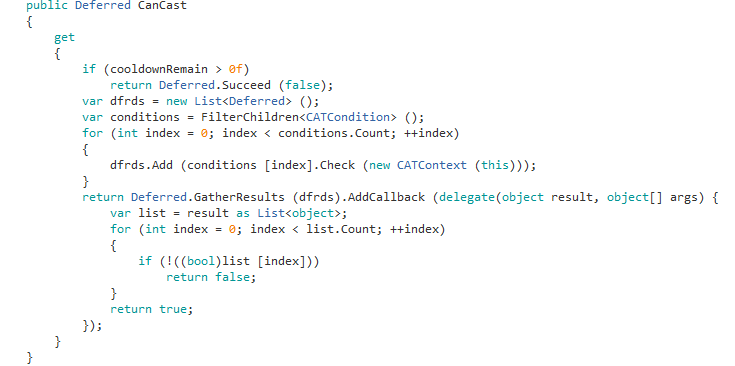
Looks pretty normal. CanCast should be implemented to check if the Spell is in cooldown, and Cast should actually cast the spell. It might be nice to have CanCast also check any Conditions attached to the Spell. We can do this like this:
To explain this a bit, FilterChildren will find all direct children of the Spell which have a CATCondition component. Next, we go through each condition and call Check to see if it is true. Check returns a Deferred, so we add that to a list of Deferreds.
Next, we have to get the values from all the Deferreds, so we use GatherResults. This takes a list of Deferreds and waits for them all to have values and then returns a list of the results. GatherResults itself returns a Deferred, and we add a callback to it which is what does the actual check.
Because of the way callbacks are chained, we just return true (success) or false (failure) from our callback and that’s what gets sent back to the caller of CanCast through the returned Deferred.
Next, let’s make a class to hold a group of spell effects called an EffectGroup. This groups effects together that have a common target (friend/enemy/etc).
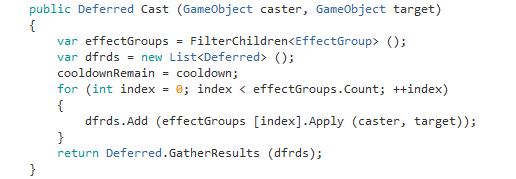
Pretty straight forward there. Let’s go back and implement Spell.Cast:
Again, this should be pretty straight forward. We gather the list of EffectGroups that are childed to the Spell and the loop through them, calling Apply and adding the returned Deferred into a list. Then we return a GatherResults deferred of all of them. This will cause the returned Deferred to not fire until all the EffectGroups have finished being applied.
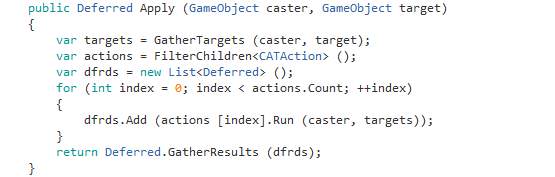
Now, let’s see what EffectGroup.Apply might look like:
This is similar to the Cast, except we gather any Actions childed to the EffectGroup and Run them. Note that we pass the list of targets as the targets parameter to Run.
That’s it! We can now build complex Spells and cast them at friends and enemies! It should be clear how CAT made it possible to build this with very little code. Similar tactics can be used for other systems. For example, an Inventory system might attach Conditions and Actions to Items which allows the player to conditionally “use” an item on a target.