This is the first in our new series of advanced technical articles. In this series, we’ll be talking about building various advanced game systems. Today’s post is about path finding. Unity includes a 3D Navmesh based path finding system, but in some cases, that may be overkill or you might need something 2D. In those instances, a waypoint based pathing system might be just the thing!
Creating A Waypoint
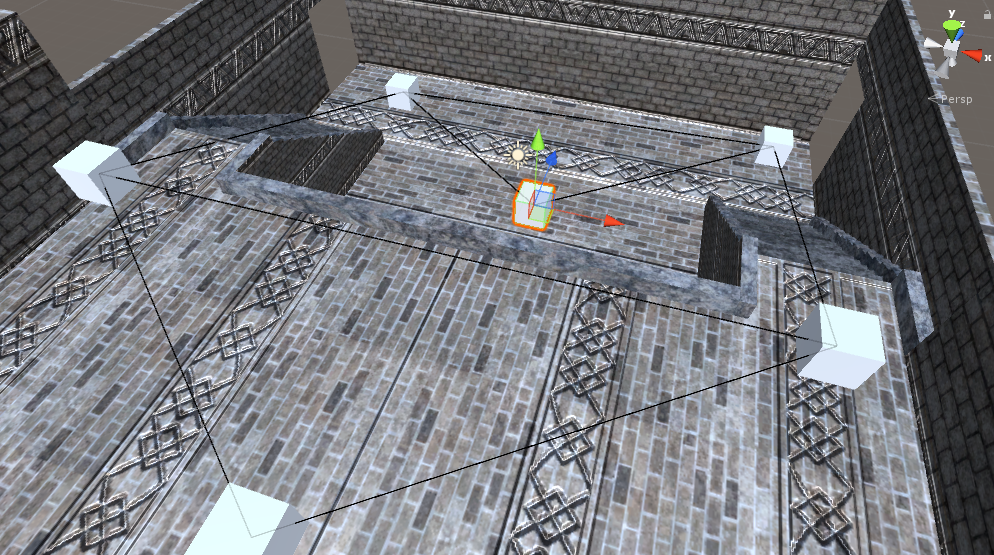
As the name implies, a waypoint pathing system consists of waypoints and facilitates pathing from one point to another based on them. Let’s start by creating a new MonoBehaviour script for the waypoints. This should be very simple. Unity already handles the position of the waypoint, so we just need to add attributes for the neighboring waypoints:
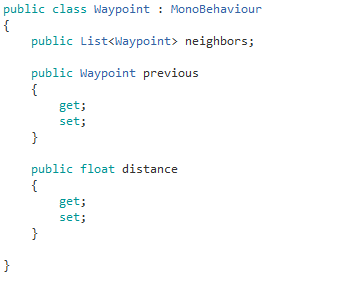
There’s some additional run-time properties to keep track of path finding info that we’ll get into later. Now, we can also fancy this up in the editor by drawing lines between neighbors:
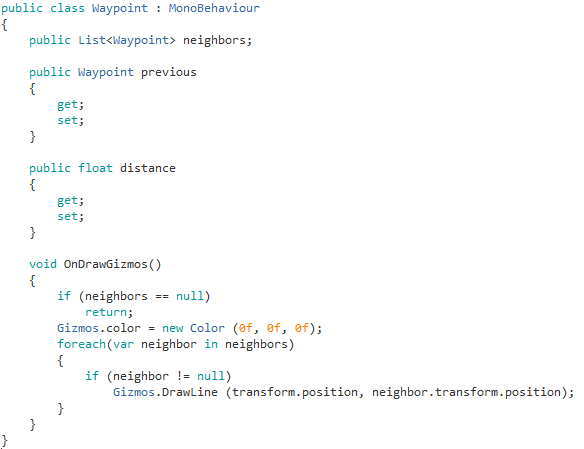
This will draw a line to all of the neighbors of this Waypoint in the Scene view of Unity. If you have a lot of Waypoints, you might want to switch to OnDrawGizmosSelected to only draw neighbors of the currently selected Waypoint.
The Pathing Manager
Next, we need to actually work on the path finding code. Let’s start with a MonoBehaviour called PathManager:
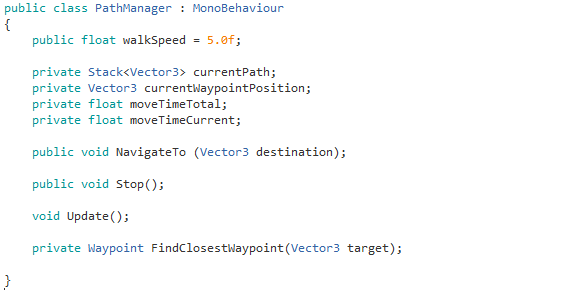
We have a public method to tell the manager to NavigateTo a destination, and another to tell it to Stop wherever it is. There’s also a parameter for walkSpeed to tell the manager how fast to move. We’ve added a currentPath to cache the path points to get to the destination along with some other helper variables which will be described later, and we also added a helper function that will find the closest waypoint to a position. Let’s implement that first:
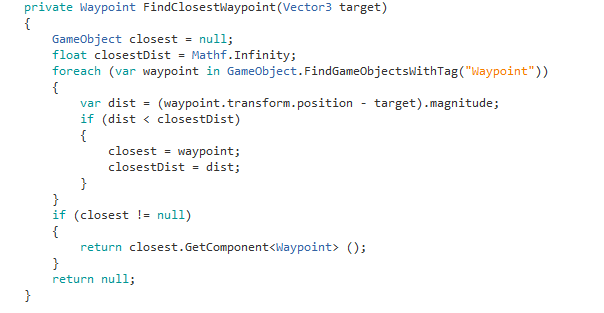
This should be pretty straight forward. Note that it requires all Waypoints to be tagged as “Waypoint.” It collects all of them and then it loops through them and returns the closest one. If you have lots of waypoints, you may want to cache them or come up with some way to avoid searching through the whole list to find the closest one. Another optimization would be to use sqrMagnitude instead of magnitude, which would save a bit of time by not calculating the square root when determining the distance. For this example, though, let’s keep it simple.
Implementing A*
NavigateTo is where the magic happens. Here, we’ll implement a typical A* search using the Waypoints. First, it needs to find the closest Waypoint to the current position and the closest one to the destination position:

We also initialize the currentPath and then check to make sure that we can find nodes for both end points and that they’re different. If the user is asking the system to path to their current location, the start and end nodes will be the same. That’s why we add this check.
Next, we can initialize the open and closed lists. In A* the open list keeps track of nodes that you want to visit, and since we need to prioritize those, we can use C#’s handy SortedList class:

The closedList is just a plain old list and keeps track of nodes that have already been visited. This prevents the algorithm from going into an infinite loop and re-trying paths it’s already examined. We immediately add the current or start node to the open List and reset its path properties.
Here’s where things get interesting. This is the main loop of the path finder:
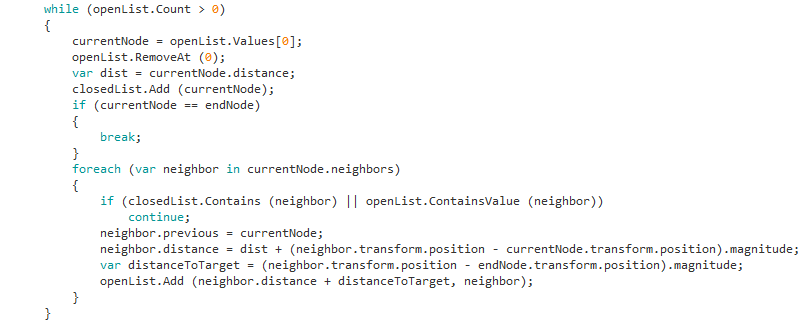
It loops until there’s no more nodes to explore in the open list. If it hits that condition, it means there’s no valid path. The first thing in the loop is to set the current node to the lowest cost node in the open list and then remove that node from the list. The node also gets added to the closed list as well so we don’t visit it again.
Next is a check to see if we reached the destination. If we did, we can just quit out of the loop. Otherwise, we need to loop through all the node’s neighbors. We skip any that have already been visited or are already in the queue to be visited, but for any others, we set the previous node, which lets us retrieve the full path later. Then we set the total path distance to get to that node by adding the path distance to the current node plus the distance between the current node and this new node. Finally, add the neighbor node to the open list and assign the cost. In A*, the cost is g(n) + h(n) where g(n) is typically the path cost (distance) to get to node n, and h(n) is known as the heuristic. This is an estimate of how close node n (current node) is to the goal. Often, you can just use the straight line distance from the node to the goal, which is what we do here.
So, to step back a bit, what will happen in this loop is that it’ll start by examining the start node. It will add all its neighbors to the open list with their cost as the path distance from the start node to that node plus the direct distance from that node to the destination node. The next loop, it will (thanks to SortedList) pick the node which is most likely to be on the right path to the target by being the shortest distance to go which gets the closest to the destination. It’ll then examine all of that node’s neighbors, pick the best node again, and so on until it reaches the destination. A* is guaranteed to find the shortest path, and it does so relatively efficiently.
A possible optimization would be to store the distances between neighboring nodes in the nodes themselves so we don’t have to recalculate that all the time. However, if the nodes were dynamic in any way, we’d also need a system to detect changes and recalculate.
After the loop, we need to recreate the path. That’s why we’ve been storing the previous nodes:
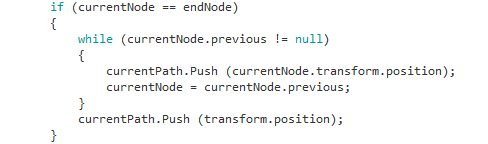
Since currentPath is a stack, we just start at currentNode, which is the end of the path, and follow the previous nodes, pushing them onto the stack. When we’re done (i.e. the previous node is null), currentPath has all the nodes that make up the shortest path starting from the start node to the end node. Finally, we just add our current position to the stack as the start point.
That’s it for A*! It’s not that scary. However, now we have to actually follow the path.
Following The Path
To follow the path, we implement an Update method:
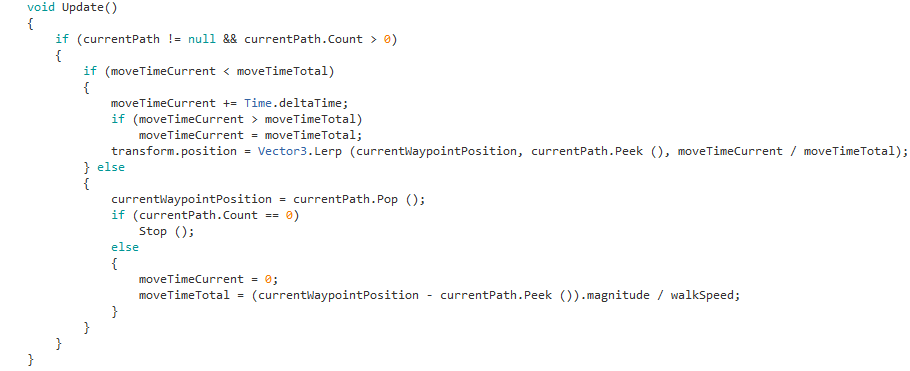
There are definitely better ways to do this, but this article is mostly about the actual path finding, so let’s just use a simple lerp between waypoint positions. First, we check that we actually have a path. Then, we check if it’s time to move on to the next node. Basically, for each leg of the path, we’re calculating how much time it should take to traverse it and setting moveTimeTotal to that. Then, we’re keeping track of how much time has passed since we started this leg and using that to get the percentage of how far down this leg of the path we are. We use that information when lerping between the current waypoint and the next one.
Once the time for the current leg has passed (or we’re just starting out since moveTimeCurrent and moveTimeTotal will be 0), we pop the next path point into currentWaypointPosition. If there aren’t any more path points, we’re done! Otherwise, calculate the time it should take to get from the current waypoint to the next one. As mentioned before, that’s just the distance divided by speed.
This method will work well for static environments, but if you’re looking to enable, disable, or move nodes during run-time, you’ll want to recalculate the path every so often to make sure it hasn’t changed. If you wanted to get fancy, you could only recalculate the path when one of the nodes in the path was modified, but that’s beyond the scope of this bare-bones system.
Stopping
The only thing left is implementing Stop, and that’s pretty straight forward:
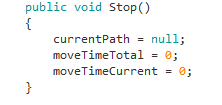
It just resets the current path and the move time.
Wrap Up & Code
That’s all there is to creating a waypoint based path system! Well, of course, there are more options that can be added such as extra path costs for rough terrain, and we could also save a lot of time by building a system to automatically link up waypoints, but those are topics for another day! Got a better way to implement this? Is there something you’d like to see us cover in future technical articles? Let us know in the comments!
About Tricky Fast Studios
Tricky Fast Studios is a US-based game studio featuring long-time industry veterans. We provide a full spectrum of game development services including bug fixing, feature development, porting, temporary staffing, and complete development. Our recent work includes The Walking Dead: March To War for Disruptor Beam, Poptropica Worlds for StoryArc Media, the Star Trek: Timelines Facebook and Steam ports for Disruptor Beam, and Wheel of Fortune Slots Casino for The Game Show Network. We’re here to build your story!


You didn’t to over how to create/find the neighbors. How do we figure out what are neighbors and where they are. That’s my only issue
Good question! Probably should be a section on that. Once you create the waypoints (just add an empty game object and attach the Waypoint component), you have to manually link up the neighbors. In the inspector, just set the Neighbors list size to however many Waypoints are walkable from the current Waypoint and then just drag in the neighboring Waypoints to the new entries. I may do a later article on how to automate that, but the short version is to do raycasts from each Waypoint to every other Waypoint and any that are clear of obstacles and within some maximum distance get added as neighbors. Hope that helps!
I love your article and it is just what I have been looking for to use in a 2D game. Excuse my ignorance but is the Waypoint component an inbuiltUnity component ? if so, where do you find ? I just need little more detail on how you initially set up the Waypoint and the list.
Glad you found the article useful! Sorry for the delayed reply. The Waypoint component isn’t part of Unity. The code for it is near the top of the article and is also in the downloadable zip file under Waypoint.cs.
I really could’ve used this article way back when I was writing bots and client helpers for Huntercoin. I never was much good at writing anything “gamey”.
Pingback: Building an Attack Slot System in Unity | Tricky Fast Studios October 10, 2017
[…] 2d) game, you’re going to need an attack slot system. In our last tech article, we went over building a waypoint pathing system. Let’s continue with the AI tutorials and build an attack slot system! One important detail […]
Great resource, finally something a bit more “bare bones” so that it’s possible to see the core of a* with waypoints and also make it your own.
What happens if you add the waypoint itself to the list of its own neighbours? (By mistake)
Does it still resolve correctly?
Thanks! Glad you liked it! While I haven’t tested it, it should already have the current waypoint in the closed list before it checks its neighbors. Therefore, it should ignore it if a waypoint has itself in its list of neighbors.
It does fail if there are two routes with the exact same distance. I use this for a hexgrid, so there can often be to paths that are identical. There will be an argument exception (element already exsists) for this line:
openList.Add(neighbor.Distance + distanceToTarget, neighbor);
Do you have an elegant way of solving this in mind?
Interesting! I actually didn’t realize SortedList would behave that way. There’s a couple options in that case. You could do away with the sorted list and loop through a normal list each time to pull out the lowest cost waypoint to check next, or you could make it a SortedList> and add any waypoints with the same cost to a list.
Thanks very much for this tutorial!
I tried something to deal with this problem. For any noobs out there like me, this works fine:
Change:
openList.Add(neighbor.distance + distanceToTarget, neighbor);
To:
if (openList.ContainsKey(neighbor.distance + distanceToTarget))
{
}
else
{
openList.Add(neighbor.distance + distanceToTarget, neighbor);
}
I think this means they won’t consider routes that maybe they should, but I haven’t had any problems yet.
Pingback: Integrating a Waypoint Pathing System Into CAT Game Builder | Tricky Fast Studios January 20, 2018
[…] going to go through an example of doing just that based on the previous post of Building a Waypoint Pathing System In Unity. If you haven’t read the previous article, you may want to do that now unless you’re […]
Hello,
I’m sorry i’m a beginner and i don’t understand how scripts’re working. where must be placed the object with the path manager in hierarchy for exemple. Thanks.
You should attach the path manager to the character / game object that you want to make move along the path. That game object can be anywhere in the hierarchy but typically would be at the root.
I have maked everything and the lines are there but the object isnt moving
P.s sorry for my bad english
You are a genius , this helped me quite extensively in understanding the basics of pathfinding on unity !! Thanks
The simple and straight forward approach might not be the fastest one but it definitely opens doors for your own navigation system implementation
Sorry for the delayed reply. Glad you enjoyed the article!
Hi, thanks for the article.
One thing I didnt understood is when you have to call the method NavigateTo?
You would call that when you want the character to move somewhere. It will find a path from where it is to the point you pass in and then start moving along that path.